How to create product listing images with AI
Turn photos of your product into a set of six marketplace images. Plan the listing, create the main photo and infographic, and check the result.
Allow approximately 35 minutes to study the lesson and complete the three built-in exercises. Assembling a complete listing for your own product independently will take another 1–2 hours.
- 1Understand the listingIdentify the purpose of the main photo and additional slides.
- 2Prepare your materialsGather photos and specifications, then create a plan in Mia.
- 3Create the imagesGenerate the main photo and a series of images while preserving the product's appearance.
- 4Add infographicsShow benefits and dimensions without inventing specifications.
- 5Check the resultsCompare the images with the original and prepare the set for publishing.
How to create product listing images with AI
To create product listing images with AI, upload photos of the real product, plan your image set, and create a separate image for each purpose. Then check that AI has preserved the product's appearance and has not invented any specifications.
In the previous lesson on AI photoshoots, you created a series of photos while preserving a person's appearance. The same principle applies here: instead of facial features, you need to preserve the product's shape, color, packaging, logo, and construction.
You can change the background, lighting, camera angle, and surroundings. The product itself must match the original.
For our example, we'll use a fictional KOVA travel mug: a sage-green stainless steel body, a black lid with a drinking valve, and a capacity of 450 ml. The mug is 20 cm tall, with a base width of 7 cm. The package contains the mug and a kraft cardboard box with the logo.
We'll turn a source photo taken on a kitchen table into six images.
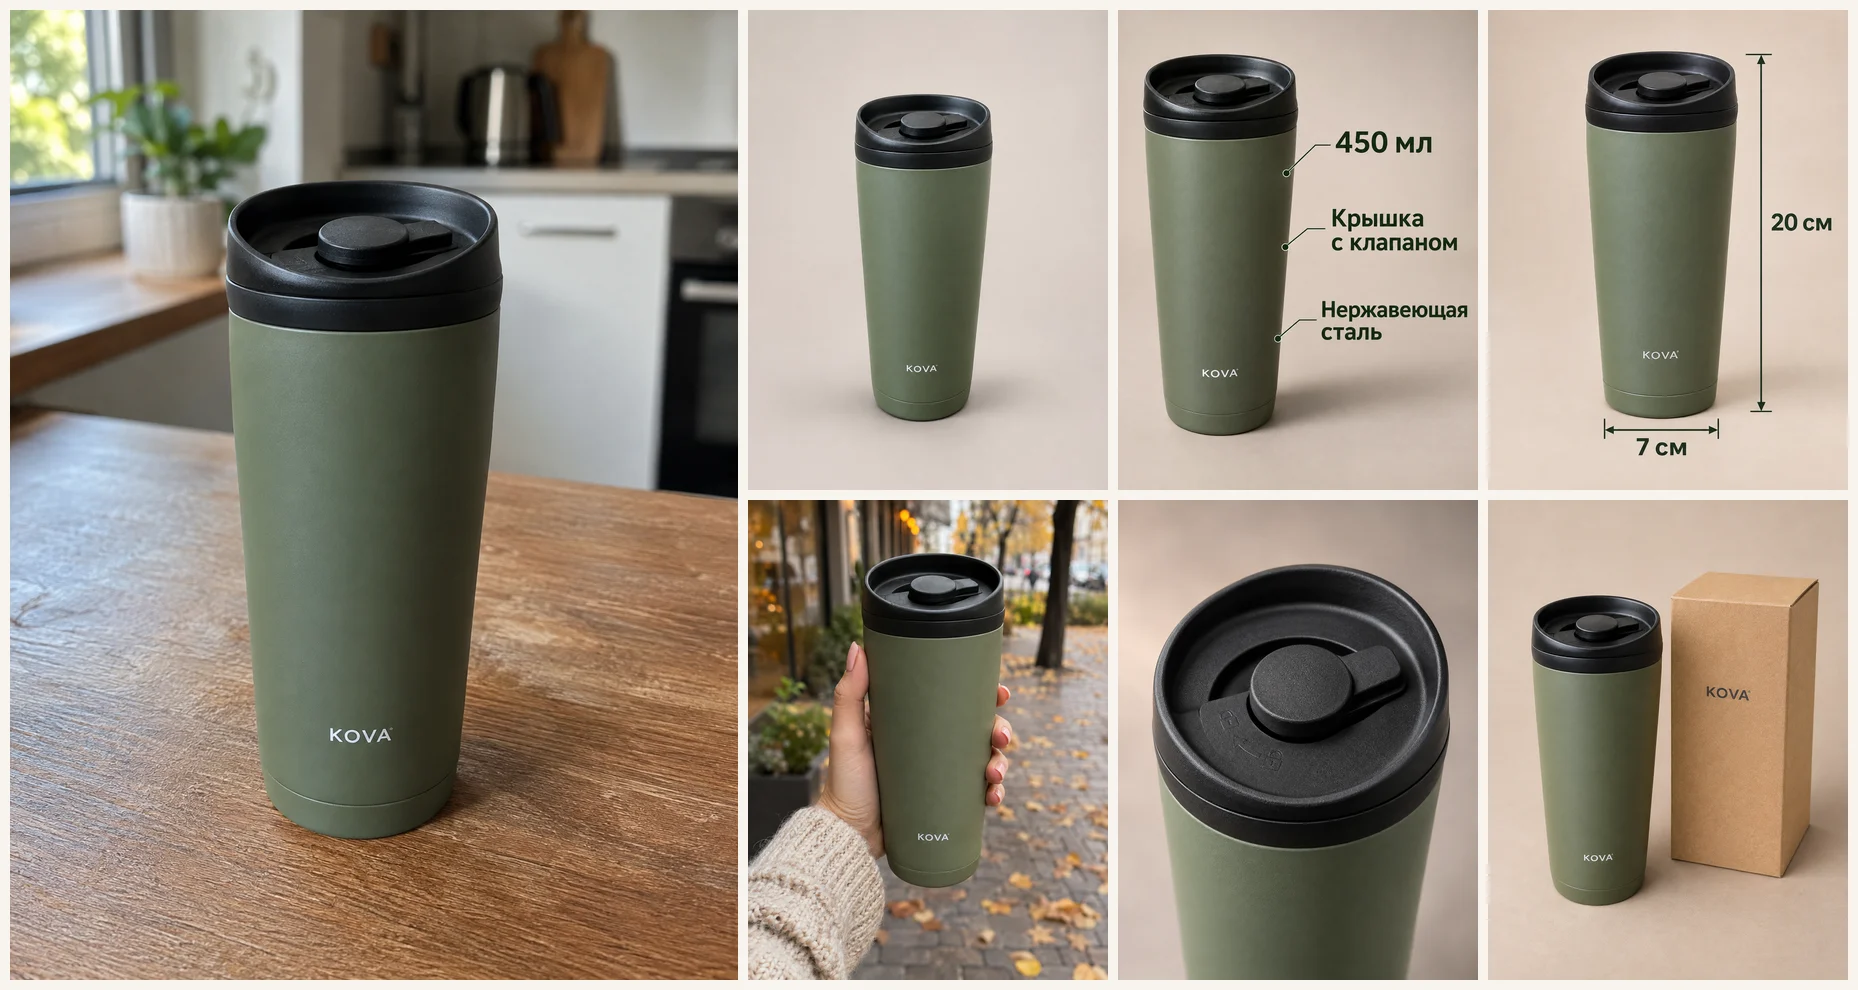
AI can create visually consistent images, but it sometimes changes the lid, distorts the logo, or makes mistakes in text. Compare every generated image with the original photo.
What images should a product listing include?
Buyers first see the main image alongside other products. After opening the listing, they look through additional images to check the specifications, dimensions, and package contents.
Each slide needs a distinct purpose.
| Slide | What to show | Purpose |
|---|---|---|
| 1. Main photo | The entire product, without distractions | Recognize the product in search results |
| 2. Benefits | The product with short labels | See verified features |
| 3. Dimensions | Measurements and scale | Understand the actual size |
| 4. In use | The product in a suitable situation | Understand its intended use |
| 5. Details | Material and construction features | Examine specific details |
| 6. Package contents | Everything included in the order | Understand what's in the package |
This is a suggested order for the lesson. For clothing, it may be more useful to show the fit and fabric earlier. For electronics, show the controls. For a dinnerware set, show all included pieces.
Use the first few additional slides for the information that matters most when choosing that particular product. For a travel mug, that's its capacity and lid design.
If five images are enough, don't create a sixth image that repeats information already shown.
What should the main image show?
The main photo should make it clear what product is being sold and what it looks like.
Show the product at a large size, usually without a complicated setting. In our practice example, it occupies approximately 60–80% of the image height.
Check the main image at thumbnail size. This is often how buyers see it in search results.
If the silhouette is hard to distinguish, details blend together, or text becomes unreadable, simplify the composition.
Prepare your source photos
A text description alone isn't enough for a listing of a real product. An AI model can draw a similar item, but it won't know the exact shape of the lid, button placement, or label design.
Take photos of the product with your phone.
- Place the product near a window with diffused daylight.
- Choose a solid background that makes the product's edges easy to see.
- Take 3–5 shots: front, three-quarter angle, side, a separate detail shot, and the label.
- Avoid filters, strong glare, and objects that block the product.
- Check that the photos are sharp and any markings are readable.
For clothing, also photograph the back and take a close-up of the fabric. For electronics, photograph the control panel and ports. For product sets, photograph every item included in the package.
Keep the originals. If the background gets in the way, you can remove it using the background removal template.
Use the most suitable source photo for each slide. A close-up of the lid is better generated from a separate photo of the lid than from a full product shot where the mechanism is barely visible.
Plan your product listing with Mia
Before generating images, gather the facts: product name, color, material, dimensions, design features, and what's included in the package.
In the lesson on writing with AI, you worked with AI using your own information. Now apply that skill to planning images and short captions.
Don't ask the model to determine product specifications on its own. As you learned in the lesson on checking AI responses, AI can confidently present invented information as fact.
Hands-on exercise: plan six slides
Open the free Mia AI chat. Prepare the details of your product and complete the exercise.
Plan a six-slide product listing
Help me plan a set of six images for an online marketplace product listing. Product: [product name]. Category: [category]. Appearance: [color, shape, material, design features]. Dimensions: [actual measurements]. Verified specifications: [list]. Package contents: [everything included in the order]. Use only the information provided. Do not invent dimensions, properties, certifications, materials, benefits, or numerical values. Create a table with four columns: slide number, purpose, what to show, text on the image. Include a main product photo, key benefits, dimensions, product in use, details, and package contents. Place the information most important to a purchasing decision near the beginning of the sequence. If a slide is unnecessary, suggest a justified replacement without repeating information already shown. For the infographic, suggest three short labels based on verified specifications. If there is not enough information, write “No data available.” For the package contents slide, list only the items included in the order. Do not add accessories or extra products. After the table, list the source photos needed. Do not write an SEO product title or a product description.
The result should be a table showing the purpose of each slide, a description of the shot, and the infographic text.
Check that the model hasn't added unverified claims, such as how long the product keeps drinks hot, whether it's leakproof, or certifications you haven't provided.
If you don't have enough information, change the slide's content. Instead of claiming an unverified benefit, show a real design detail.
We won't write an SEO product description or a search-friendly product title here. That's a separate task covered in lesson 03.
Create the main product photo
For the first image, we'll use a vertical 3:4 aspect ratio, a light background, and soft lighting.
You already learned how to upload a photo and choose a model and image quality in lesson 07. Here, we'll focus on keeping the product accurate.
Create a beautiful, professional product photo of a travel mug for an online marketplace. Add professional lighting and a stylish background.
The model may change the lid, proportions, or body color because the prompt doesn't tell it to preserve those features.
Use the uploaded photo of the KOVA travel mug as an exact product reference. Preserve the body shape, proportions, sage-green color, matte finish, black lid with its drinking valve, and KOVA logo without any changes. Remove the original surroundings. Show the entire mug against a light, neutral background. Soft studio lighting, natural shadow, three-quarter camera angle. The product should occupy approximately 70% of the image height. Vertical 3:4 aspect ratio. Do not add text, accessories, or new design details.
The second prompt specifies what can change and what must stay the same.
Hands-on exercise: main product photo
Upload an original photo of your own product and start the generation.
Create the main product photo
Use the uploaded original product photo as an exact reference. Preserve the product's shape, proportions, color, material, construction, label, logo, and all visible details without changes. Remove the original surroundings. Show the entire product against a light, neutral background. Use soft studio lighting and a natural contact shadow. Three-quarter camera angle. The product should occupy approximately 70% of the image height. Vertical 3:4 composition. Do not add text, accessories, people, new elements, or extra objects. Do not change the product's specifications.
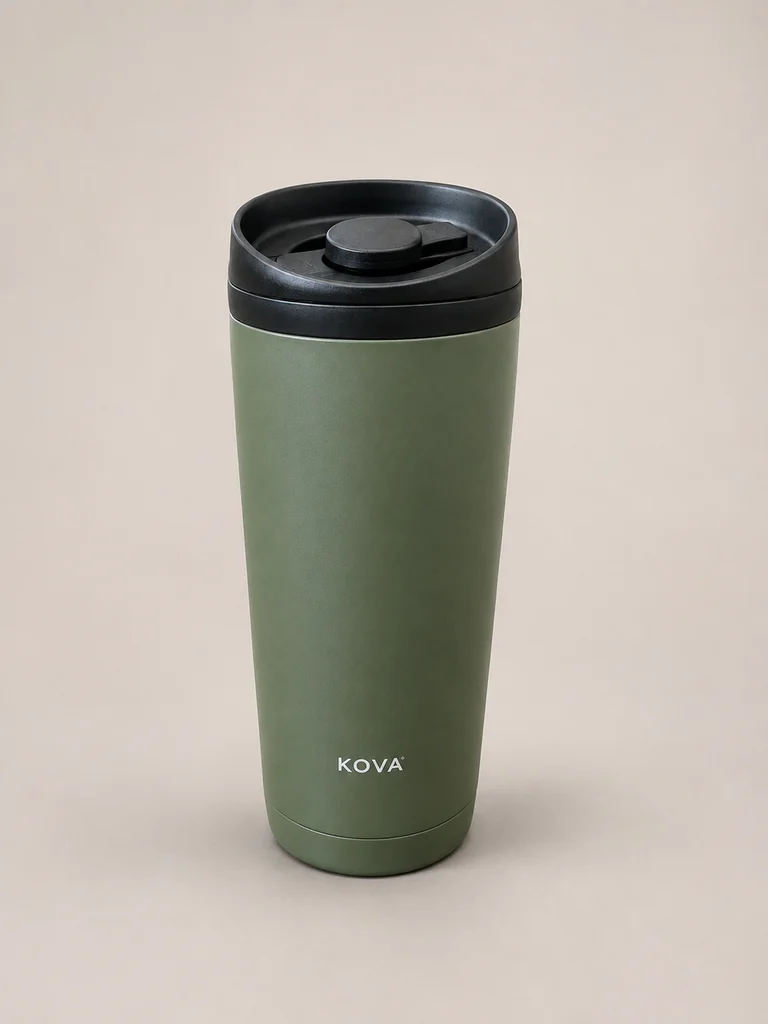
Compare the result with the source image. Check the silhouette, color, number of components, construction, and branding.
If the model changes an important part of the product, generate the image again with a more specific constraint or use a better source photo.
Create two cover image variations
You can try different layouts for the main product photo without changing the product itself.
Start with two variations:
- A: Plain light background, product centered.
- B: Neutral background with a soft shadow, product slightly off-center for better composition.
Keep the camera angle and product scale consistent. This will help you evaluate the effect of the layout.
View both images as small thumbnails. Compare which one makes the product's shape, color, and details easier to see.
This is a visual readability check, not a full sales A/B test. To measure how a cover image affects orders, you need impression and buyer behavior data collected under comparable conditions.
If your marketplace offers testing tools, you can compare cover images using real traffic. A more attractive design doesn't automatically lead to more orders.
How to create a consistent series of slides
For the remaining images, use the approach from lesson 09: keep the product and style instructions consistent, then change the part of the prompt that describes each slide.
Reusable part of the prompt
Use the original product photo as an exact reference. Preserve the shape, proportions, color, material, construction, label, and logo. Light, neutral color palette, soft natural lighting, realistic shadows. Consistent product photography style. Do not add nonexistent details or product features. Vertical 3:4 aspect ratio.
Add the instructions for the specific slide.
Product in use
Show the original KOVA travel mug held by an adult on an autumn city street. The hand should grip the body naturally without covering the logo. The mug is 20 cm tall; keep its size realistic relative to the person's hand. Show only the hand and part of the sleeve, with no face visible. Blurred urban background, soft daylight. Do not change the lid, drinking valve, or body shape.
Check the finger positions, mug scale, and lid construction.
Product in a lifestyle setting
Place the original product on a wooden kitchen countertop. Show a bright kitchen in the background. The entire product must be visible and remain the main subject. Slightly blurred background, natural lighting. Do not add accessories that could appear to be included with the product.
For another product, choose a setting that fits its purpose: put a lamp on a desk or a pillow on a sofa.
Close-up of a product detail
Use a separate photo of the KOVA travel mug's black lid. Create a close-up of the upper section with the rotating drinking valve, viewed from above at a 45-degree angle. Preserve the exact number, shape, and position of all components. Soft side lighting should highlight the plastic texture. The lower part of the mug extends beyond the bottom edge of the frame. Do not invent hidden components or additional buttons.
The model shouldn't guess how a component is built. For an accurate close-up, upload a photo of the specific detail.
What's included in the package
First, photograph everything included in the order and compare the photos with the packing list. For a bundle, use real photos of each included item.
Then ask AI to arrange the items so buyers can see them separately.
The KOVA package includes the travel mug and a kraft cardboard box with the logo.
Use the uploaded original photos of the KOVA travel mug and its kraft cardboard box. Preserve the shape, dimensions, color, material, lid, and logos without any changes. Arrange only two items neatly on a light beige-gray background: the travel mug standing on the left and a simple kraft cardboard box with a small KOVA logo lying on the right. Slightly elevated camera angle, soft studio lighting, realistic shadows. Do not add accessories, drinks, instructions, plants, or any other objects. Vertical 3:4 aspect ratio.
If you're selling a bundle, don't generate items that aren't included. Buyers should see exactly what they'll receive.
How to use a competitor's design as inspiration
You can study another seller's product listing to understand its composition: product placement, empty space for text, color palette, and the order of visual elements.
Don't copy someone else's entire listing image, logo, or photos without the necessary rights.
Describe the design approach you like in your own words:
Light background, product positioned on the left, empty space on the right for product specifications. Large text blocks, restrained color palette, consistent spacing.
Use your own product photos and text.
You already learned about the different roles of reference images in the lesson on AI photo prompts. Here, the source photo defines the product's appearance, while the design example provides guidance only for composition and style.
How to show accurate product dimensions
You can use a separate slide to display product dimensions or show the product next to another object for scale.
For KOVA, we'll use a height of 20 cm and a base width of 7 cm. A vertical dimension line shows the height, while a horizontal line beneath the base shows the width.
Example prompt:
Use the original photo of the KOVA travel mug. Preserve its appearance without changes. Position the mug upright in the center against a light beige-gray background, viewed directly from the front. Add a thin dark-green vertical dimension line on the right with the exact label “20 cm” and a horizontal line beneath the base labeled “7 cm”. Large sans-serif font, soft studio lighting. Do not add any other text or objects. Vertical 3:4 aspect ratio.
For your own product, enter its actual measurements. AI cannot reliably determine dimensions from an ordinary photo.
If the model makes mistakes in the numbers or dimension lines, add them manually over the source image in a graphic editor.
When comparing a product with a hand, table, or furniture, check the proportions. An AI-generated scene may make the product look larger than it really is.
How to create product infographics with AI
A product infographic combines an image of the product with short labels describing its features.
Three or four key points are enough for one slide. Use large, high-contrast text and leave space between the labels and the product.
Our KOVA example uses three labels:
- “450 mL”
- “Lid with drinking valve”
- “Stainless steel”
These specifications describe a fictional travel mug used in this lesson. For your own product, use verified information.
There are two ways to create an infographic.
| Method | Advantage | Limitation |
|---|---|---|
| AI generates the text | Image and labels are created together | Letters and numbers may contain errors |
| Text is added separately | You can control the exact wording and fonts | Requires a graphic editor |
Generate the image and text together
You can try GPT Image 2.6 Flare or Nano Banana Pro for this.
Prompt for KOVA:
Use the original photo of the KOVA travel mug. Preserve the sage-green body, matte finish, black lid with its drinking valve, and logo without any changes. Create a 3:4 infographic on a light beige-gray background. Position the travel mug on the left and add three labels on the right: “450 mL”, “Lid with drinking valve”, and “Stainless steel”. Reproduce the text exactly, without adding extra words. Large dark-green sans-serif font, thin callout lines, clean spacing. Do not place text over the product.
Check every letter, symbol, and unit of measurement. Even a model that's good at generating text can make spelling or number errors.
Hands-on exercise: add three labels
Prepare three verified specifications for your own product.
Create an infographic with three labels
Create an informational slide for a product listing using the uploaded original product photo. Preserve the product's shape, proportions, color, material, construction, markings, and logo without changes. Vertical 3:4 composition. Light, neutral background with soft shadows. Place the product on the left and leave room for three separate text blocks on the right. Add exactly three labels. Reproduce each one character for character: “[Verified specification 1]” “[Verified specification 2]” “[Verified specification 3]” Use large, readable, dark text. Do not add any other words, numbers, icons, specifications, or decorative objects. Do not cover the product with text. If a label is long, expand the text area without shortening or changing the wording.
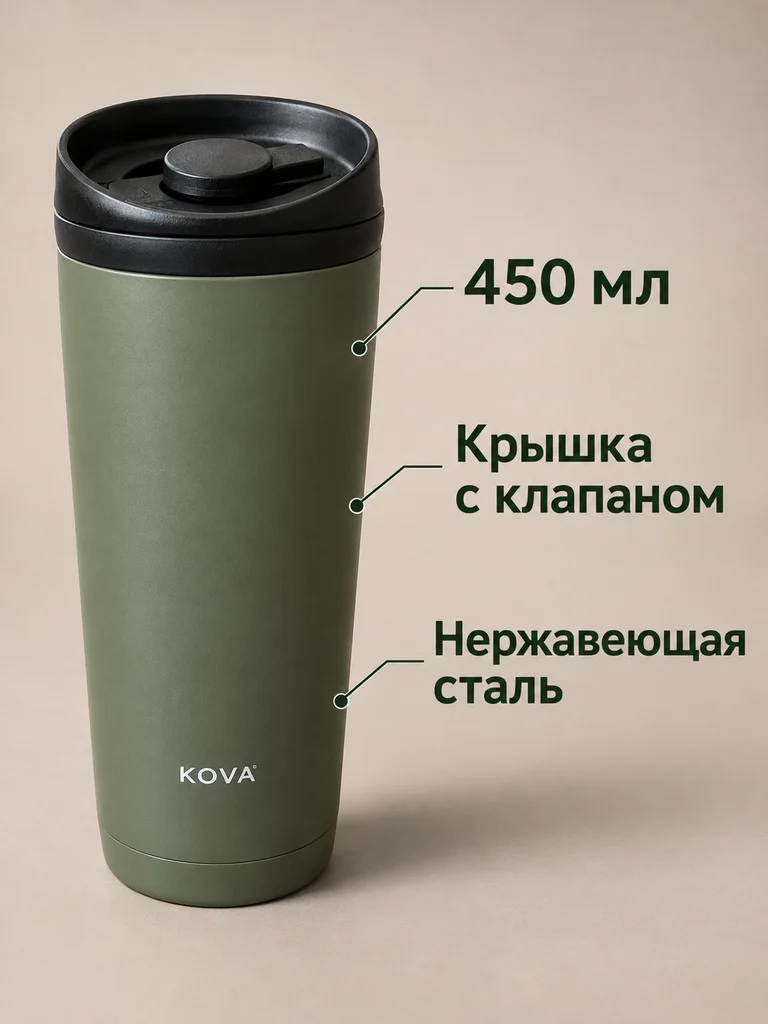
Compare the generated image with the original and check the labels.
If the text is distorted, use the second method.
Generate the background with AI and add text separately
Create an image with space for text:
Preserve the original product without changes. Position it on the left against a light background. Leave clean, empty space on the right for three text blocks. Vertical 3:4 aspect ratio. Do not add letters, numbers, icons, or decorative label boxes.
Open the result in Canva, Figma, or another graphic editor and enter the specifications manually.
This method works well for dimension diagrams, long material names, and product listings that use consistent typography.
Product listing prompt builder
Choose the slide's purpose, background, lighting, and camera angle. The prompt builder will combine your choices into a prompt that includes instructions to preserve the product's appearance.
Use the generated prompt with your original product photo.
If the image doesn't turn out as expected, change one parameter and try again. You already practiced this approach in lesson 09.
Common problems with AI product listing images
| Problem | Cause | Solution |
|---|---|---|
| The shape, lid, or body has changed | The model recreated the product | Upload a clear original photo and make the preservation instructions more specific |
| Extra hands or objects appear | The scene contents weren't defined | Specify which objects are allowed |
| Product scale looks wrong relative to its surroundings | The model doesn't know the dimensions | Provide actual measurements |
| Text is distorted | Text generation error | Add the text separately |
| The logo is distorted | The model redrew the branding | Use the original logo element |
| The background distracts from the product | Too many bright details | Simplify the background |
| All slides look the same | The slides don't have distinct purposes | Revise the product listing plan |
| The model refuses to generate an image | The request may violate the model's rules | Review potentially restricted elements and rephrase the request as a permitted task |
If the model keeps changing your product after several attempts, stop trying to regenerate the entire product.
Alternative method:
- Remove the background from the original photo while keeping the product intact.
- Ask AI to generate only the background, without the product.
- Combine the original product photo with the new background in a graphic editor.
- Add a realistic shadow and check the scale.
This keeps the product authentic while AI handles only the surroundings.
If the model refuses a request, don't try to bypass moderation. Check your rights to the source materials and review the prompt's content.
Independent exercise: create images for your own product listing
Now prepare a complete set of 5–6 images. Use your own product or an item you can photograph and measure.
To show what's included in the package, use photos of every item in the order. If AI consistently changes the product, use the original photo with an edited background.
The goal is an accurate product listing, not the highest possible number of generations.
Check your product listing images before publishing
Save the images in a separate folder in the order buyers should view them: main photo, benefits, dimensions, product in use, details, and package contents.
View the files as small thumbnails, similar to how they'll appear on a phone screen. Check sharpness and text placement.
Test your knowledge
Four scenarios will help you check whether you can choose the right actions when preparing product listing images.
Image requirements for Wildberries, Ozon, Yandex Market, and Avito
Wildberries, Ozon, Yandex Market, and Avito are major Russian online marketplaces. The requirements below are based on their seller help documentation as of November 2026. Before uploading images, check the latest rules for your marketplace and product category.
| Marketplace | Formats and limits | Main image and presentation |
|---|---|---|
| Wildberries | JPG, PNG, WEBP; up to 10 MB; up to 30 photos; minimum resolution of 700×900 pixels | Show the entire product on a neutral background, without packaging; infographics and text on the cover image can lower the listing's rating |
| Yandex Market | JPG, JPEG, PNG, HEIC, WEBP; up to 10 MB; minimum resolution of 200×200 pixels; shoppers see images in a 3:4 aspect ratio | White or transparent background; the product must occupy at least two-thirds of the frame |
| Ozon | Vertical 3:4 aspect ratio; check other limits in your seller dashboard | Infographics are allowed; watermarks are prohibited |
| Avito | Check technical specifications in the marketplace's help documentation | Show the actual product and its real condition |
Wildberries requirements
Wildberries prohibits prices, discounts, QR codes, contact information, watermarks, and promotional words such as “bestseller” on product images.
Infographics and text on the main image are not prohibited, but they can lower the listing's rating. A clean product image is therefore a better choice for the cover.
Wildberries also warns that poorly generated AI photos can lower a listing's rating. Images should look realistic.
You can upload one video in MP4 or MOV format, up to 3 minutes long and 50 MB in size.
Yandex Market requirements
The main image must show the product against a white or transparent background. The product must occupy at least two-thirds of the frame.
Yandex Market allows realistic illustrations but prohibits watermarks, prices, and store logos. A brand logo on the product itself is allowed.
You can add up to six videos, each up to 100 MB.
Ozon requirements
Product photos use a vertical 3:4 aspect ratio. Infographics are allowed, but watermarks are prohibited.
Check your seller dashboard for the latest requirements on image resolution, file size, and number of images.
Avito requirements
On Avito, buyers often assess the condition of the specific item being sold, especially when it is used.
For these listings, real photos should show signs of wear, defects, included items, and product labels.
You can use AI to edit the background as long as the result does not hide damage or misrepresent the item's condition.
Do not make a used item look brand-new and free of defects.
If you sell on Amazon, eBay, or Etsy, check the image requirements in their seller help.
Tools for creating product listing images
You can combine several tools to create a product listing.
| Tool | What to use it for |
|---|---|
| Nano Banana, GPT Image, and Flux AI models | Generate product photos and change backgrounds or surroundings |
| AI chat | Plan slides and write short captions |
| Canva, Figma, or another editor | Add accurate text and dimension lines, and arrange the layout |
| Dedicated product listing tools | Create image sets from templates or automatically |
| Neuromia | Generate individual images, use templates, and build a series of slides |
The right tool depends on the task. For a single image, an image generator is enough. For a series of images with different purposes, you need a plan. A graphic editor gives you better control over exact text.
How to create product listing images in Neuromia
Neuromia offers three options: the image editor, the “Product Listing” tool, and ready-made templates.
| Method | When to choose it | Result |
|---|---|---|
| Image editor | You want control over every prompt | Individual images |
| Product Listing | You want to create a series in one workflow | Up to six slides per run |
| Templates | You need one image with a preset layout | One image |
Image editor
Open the image editor, upload the original photo, and choose a model, aspect ratio, and image quality: 1K, 2K, or 4K.
The 1K, 2K, and 4K labels indicate the approximate length of the image's longer side: around 1,000, 2,000, and 4,000 pixels, respectively. Exact dimensions depend on the aspect ratio and model settings.
The cost appears before you start generation.
The editor makes it easy to compare prompts, fix individual images, and choose different models for product photography and infographics.
Product Listing tool
Open the marketplace product listing page and go to your account.
Follow these steps:
- Upload a product photo and, if needed, your own background image.
- Choose “Template,” “Auto,” or “Manual” mode.
- Set the product listing parameters.
- Create up to six slides in one run.
- Check the product's shape, text, and content in every image.
“Template” uses a ready-made style. In “Auto” mode, AI distributes the content across slides. “Manual” lets you write a separate prompt for each image.
The tool supports marketplace image dimensions. The AI model renders the infographic text, so you need to check it carefully.
Ready-made templates
If you only need one image, choose a suitable template:
- “Universal: white” — a neutral product background.
- “Beauty: minimal” — beauty products.
- “Fashion: studio” — clothing.
- “Home: cosy” — home goods.
- “Tech: neon” — electronic devices.
- “Universal: gift” — gift-themed styling.
A template handles one image. For a complete six-slide set, you still need a plan and a final review.
How much does a six-slide set cost?
The cost depends on the method you choose and how many attempts you make. For comparison, let's calculate six generations without retries.
Image editor
| Model | One image, 1K | Six images, 1K |
|---|---|---|
| Flux 3 Klein | 1.76 credits | 10.56 credits |
| Nano Banana | 4.4 credits | 26.4 credits |
| Nano Banana 2.1 | 4.4 credits | 26.4 credits |
| Flux 2 Pro | 5.5 credits | 33 credits |
| Flux Kontext | 5.5 credits | 33 credits |
| GPT Image 2.5 | 6.6 credits | 39.6 credits |
| Nano Banana 2 | 8.8 credits | 52.8 credits |
| Nano Banana Pro | 19.8 credits | 118.8 credits |
Six GPT Image 2.5 images at 2K quality cost 66 credits.
Product Listing tool
| Quality | One slide | Six slides |
|---|---|---|
| Standard | 10 credits | 60 credits |
| Premium, 1K/2K | 30 credits | 180 credits |
| Premium, 4K | 40 credits | 240 credits |
Additional image processing costs extra.
Upscaling increases image resolution. Neuromia offers Recraft and Topaz tools for this.
Background removal costs 1.1 credits per image, Recraft upscaling costs 0.55 credits, and Topaz costs 11 credits.
For example, six Nano Banana images at 4.4 credits each, plus one background removal at 1.1 credits, cost 27.5 credits.
Retries increase the total cost. The smallest Neuromia credit package costs 99 ₽.
Seasonal and themed variations
For a promotion or seasonal collection, you can change the product's surroundings without rebuilding the entire listing.
For the KOVA travel mug, an autumn street with soft daylight would work well. A gift set could use subtle holiday decorations.
Example prompt:
Use the original photo of the KOVA travel mug. Preserve its shape, sage-green body, black lid with a drinking valve, matte finish, and logo exactly as they are. Create an autumn-themed setting with warm lighting and subtle seasonal details in the background. Keep the product as the main subject. Do not add text about discounts, gifts, or new product features.
Do not present seasonal props as items included with the product.
Finish the main product listing first. Then, if needed, create a seasonal cover image to compare with the original.
Ready-to-use prompts for different product categories
Below are additional prompts for specific product categories. Use them with your original product photos.
Cosmetics
For cosmetics, you need to preserve the packaging shape, dispenser, label, and actual volume.
Main image:
Use the original photo of the cosmetic product. Preserve the bottle's shape, proportions, color, material, cap, dispenser, logo, and all label text exactly as they are. Place the packaging on a light matte surface. Use soft shadows and a clean composition. Vertical 3:4 aspect ratio. Do not add ingredients or unverified product claims.
Detail:
Use a separate original photo of the dispenser. Create a close-up of the top of the bottle. Preserve the shape, construction, color, material, and position of every component. Soft side lighting, neutral background. Do not invent a dispensing mechanism or add new details.
Only include ingredient information and product benefits supported by verified product data.
Clothing
For clothing, you need to preserve the cut, color, fabric texture, and seam placement.
Studio photo:
Use the original clothing photos as an exact reference. Preserve the cut, length, proportions, color, fabric texture, seams, fasteners, label, and decorative details without changes. Show the garment against a light neutral background with soft studio lighting. Vertical 3:4 aspect ratio. Do not add pockets, buttons, or prints.
Fit:
Show the original garment worn by an adult in a natural pose. Preserve its construction, color, length, texture, seam placement, and fasteners. Neutral background, realistic proportions. Do not change the cut or add new elements.
An AI-generated fit image does not replace actual measurements or a size chart.
Electronics and devices
For electronics, buttons, ports, screens, and product markings are especially important.
Main image:
Use the device photo as an exact reference. Preserve the body shape, proportions, color, material, screen, buttons, ports, markings, and logo without changes. Light neutral background, soft studio lighting, vertical 3:4 aspect ratio. Do not add indicator lights, ports, or controls.
Detail:
Use a separate photo of the device's port panel. Show a close-up of the panel. Preserve the exact number, shape, size, and position of every port, along with the body color and markings. Soft lighting, clean background. Do not invent new ports or labels.
If you need to show the device's interface, use an image of the actual interface.
Home and kitchen
For home products, showing the item in a suitable interior can help buyers understand how it will look in use.
Lifestyle setting:
Use the original product photo. Preserve the shape, proportions, color, material, dimensions, construction, markings, and logo without changes. Place the product on a suitable surface in a bright home interior. Soft daylight, natural shadows. Vertical 3:4 aspect ratio. Do not imply that the surrounding props are included with the product.
Scale:
Use the original product photo. Preserve the shape, dimensions, color, material, and construction without changes. Show the product on a countertop next to everyday objects. Actual product dimensions: [enter measurements]. Maintain realistic proportions. Do not add invented measurements. Leave empty space for dimension labels.
If the scale looks wrong, use a real photo and add the measurements manually.
Food products
For food products, you need to preserve the packaging, product name, ingredient information, and labeling accurately.
Main image:
Use the original photo of the food packaging. Preserve its shape, proportions, color, material, brand design, product name, logo, and the position of all text without changes. Light background, soft lighting, vertical 3:4 aspect ratio. Do not add ingredient illustrations or claims about the contents.
Lifestyle setting:
Use the original photo of the sealed food package. Preserve its design, dimensions, color, shape, product name, and labeling without changes. Show the package on a kitchen table with a neutral kitchen interior in the background. Do not add other food products in the foreground or alter the label.
Do not use AI-generated contents as evidence of what is actually inside the package.
Children's products
For children's products, accurately showing the construction, fasteners, and included components is essential.
Main image:
Use the original photo of the children's product. Preserve its shape, proportions, material, color, dimensions, fasteners, structural components, markings, and logo without changes. Show the entire product against a light neutral background. Soft studio lighting, vertical 3:4 aspect ratio. Do not add features or accessories that are not present in the original.
Detail:
Use a separate original photo of the fastening mechanism. Show a close-up of its construction. Preserve the exact number, shape, material, color, and position of all components. Neutral background, soft lighting. Do not invent additional clips, mechanisms, or parts.
Only state age restrictions, safety information, and certifications supported by the documentation for the specific product.
Frequently asked questions
Can I create product listing images with AI for free?
You can plan your slides and write infographic text for free in the Mia AI chat. Image generation in Neuromia costs credits. The smallest credit package costs 99 ₽.
Other services may offer free modes with limitations. Check their terms separately.
Which AI model is best for product listing images?
The best choice depends on your source photo and the task. For product photography, you can compare Nano Banana, Nano Banana 2.1, GPT Image 2.6 Flare, and Flux models.
For infographics with short text labels, try GPT Image 2.6 Flare or Nano Banana Pro. Check the accuracy of the product and text, not just the visual design.
Can I create product listing images without a photo?
AI can generate a product image from a text description, but it cannot guarantee that the result will match the real product.
For actual sales, use your own photographs or original images you have permission to use. Generating an image without a source photo works for concept designs, but it does not verify the specifications of the product being sold.
How do I create product infographics with AI?
Prepare 2–4 short labels based on verified product specifications. Upload the product photo and include the exact text in quotation marks.
If the model makes mistakes in letters or numbers, generate an image with empty space for the text and add the labels in a graphic editor.
What prompt should I use for product listing images?
Start by instructing the model to preserve the product's shape, proportions, color, material, label, and logo. Then describe the slide's purpose, background, lighting, and camera angle.
For a series, keep the core instructions consistent and change the content of each image. For more on prompt structure, see the AI photo prompts lesson.
Do online marketplaces allow AI-generated product images?
Rules vary by marketplace and product category. Images must accurately represent the product and comply with the marketplace's listing requirements.
Wildberries specifically warns that poorly generated AI photos can lower a listing's rating. Yandex Market allows realistic illustrations. Always check the latest rules of your chosen marketplace before publishing.
What image format and size do Wildberries and Ozon require?
According to Wildberries seller documentation as of November 2026, supported formats are JPG, PNG, and WEBP, with a maximum file size of 10 MB and a minimum resolution of 700×900 pixels.
Ozon uses a vertical 3:4 aspect ratio. Check the seller dashboard for its other technical requirements. Review both marketplaces' latest documentation before uploading.
What to learn next
Your set of static product listing images is ready. The next step is a short video that shows the product moving or being used.
In Lesson 11, “How to generate AI videos from text,” you'll move on to the Video level and learn to control movement within a shot. You can use the main product photo from this lesson for your first hands-on exercise.