How to create an AI photoshoot with your own face
Turn a single photo into a consistent AI photoshoot. Plan your shots, preserve your facial features and visual style, experiment with poses, and select the best images.
What is an AI photoshoot?
An AI photoshoot lets you create several photos featuring your own face without visiting a photography studio. You upload a source image, specify the outfit, location, and lighting, then generate images with different poses and camera angles.
For example, you can turn an ordinary selfie taken at home into a series set in an old European city: a portrait by a stone wall, a full-body street photo, a shot at an outdoor café table, and a close-up three-quarter portrait.
To make the images look like they belong to the same photoshoot, the person needs to remain recognizable. The outfit, hairstyle, lighting, and color grading should also stay consistent.
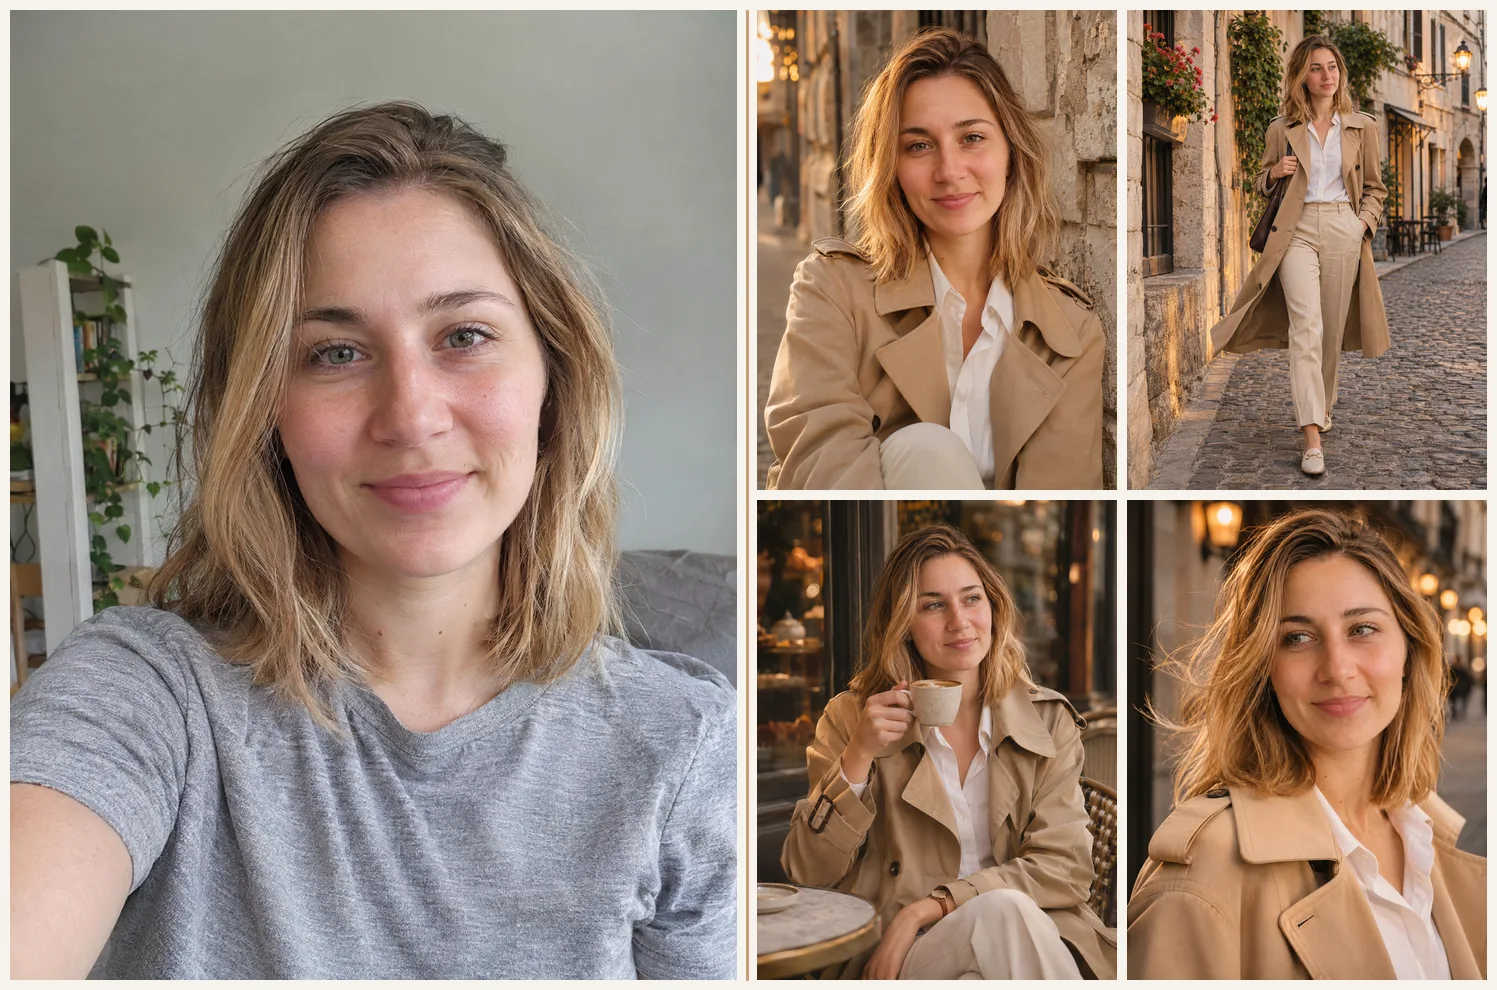
In the “How to generate AI photos from text or your own pictures” lesson, you learned to create a single portrait from your photo. Now the goal is to generate 6–10 consistent shots with different compositions.
| Ready-made template | Custom photoshoot | |
|---|---|---|
| What you get | One photo with a predefined look | 6–10 different shots in a consistent style |
| What you do | Upload a photo and choose a look | Plan the outfit and shots, check facial similarity |
| When to choose it | You need a quick result, such as the “AI editorial photoshoot” | You need photos for a profile picture, social media posts, or an about page |
You can create this kind of series with ChatGPT, Gemini with image generation support, Nano Banana, and other tools that accept photos as reference images.
There are two approaches to creating an AI photoshoot. The first is to attach the original photo every time you generate a shot. The second is to train a personalized model on a collection of photos, if your chosen tool supports that feature. The second approach may require additional photos and a separate training step.
We'll use the first approach. You can start with an ordinary selfie without training a personalized model.
Prepare your photo and choose a concept
To get started, you only need one good-quality photo where your face is clearly visible. A front-facing photo works best, without heavy filters, dark sunglasses, or objects covering your face.
For more challenging camera angles, additional three-quarter or full-body photos may help if the selected model supports multiple reference images.
You already covered the requirements for source photos, uploading images, and checking results in the “How to generate AI photos from text or your own pictures” lesson. Here, preparation takes just one step: choose an original photo that works well and keep it available for every subsequent generation.
You don't need to photograph yourself wearing the outfit you want in the finished images. AI can replace your clothing based on a text description.
Choose one concept
Your concept determines which photos will make up the series. Start by deciding what you need them for: a profile picture, résumé, social media, personal website, or gift.
For this exercise, we'll use an editorial city photoshoot.
| Parameter | Choice |
|---|---|
| Theme | A walk through an old city |
| Outfit | Beige trench coat, white shirt, light-colored pants |
| Hair and makeup | Neatly styled hair, light natural makeup |
| Location | Cobblestone streets, historic building facades, cafés |
| Lighting | Warm evening light, soft shadows |
| Photo editing | Natural skin texture, warm film-style color grading |
| Format | Vertical 3:4 |
Within this series, we'll keep the outfit, time of day, and visual style unchanged. Different locations in the old city are fine as long as they look like stops along the same walk.
Make a shot list
The main difference between an AI photoshoot and a single portrait is that you plan the variety of shots in advance.
Six compositions are enough for your first series.
| Shot | Composition | Purpose |
|---|---|---|
| 1 | Chest-up portrait by a stone wall, looking at the camera | Profile picture |
| 2 | Full-body shot on a narrow street, natural pose | Wide shot |
| 3 | Waist-up shot at an outdoor café table | Casual photo |
| 4 | Close-up three-quarter portrait, looking to the side | Focus on the face |
| 5 | Walking along the street, trench coat slightly open | Movement |
| 6 | Sitting on a stone bench, looking at the camera | Closing shot |
Each image serves a different purpose. The first focuses on the face, the second shows the full outfit, the third adds the surrounding environment, the fourth changes the gaze direction, and the fifth captures movement.
The sixth shot closes the series with a calmer composition.
You don't have to use all six images in a single post. The purpose of planning is to give yourself options after generation.
Ask AI to plan your photoshoot
In the “How to write and edit text with AI” lesson, you learned to define a task, set constraints, and specify the output format.
Apply those skills to planning your photoshoot. An AI chat can act as a photography assistant, suggesting compositions, hand placement, and the order of shots.
Act as a professional photographer and art director. Create a 6-shot plan for an editorial city AI photoshoot.
One person, one outfit: a beige trench coat over a white shirt, with light-colored pants.
Location: an old European city with cobblestone streets and outdoor cafés. Warm evening light, soft shadows, editorial photography style.
For each shot, specify the framing, pose, hand placement, gaze direction, and camera position.
Alternate between close-up, medium, and wide shots. Keep the outfit, hairstyle, and lighting consistent.
Present your answer as a table with 6 rows.
Plan your AI photoshoot
Act as a professional photographer and art director. Create a 6-shot AI photoshoot plan for one person. Theme: an editorial walk through an old European city. Outfit: a beige trench coat over a white shirt, light-colored straight-leg pants, and neatly styled hair. Locations: cobblestone streets, historic building facades, and an outdoor café. Warm evening light, soft shadows, natural skin texture, and warm film-style color grading. For each shot, describe the framing, pose, hand placement, gaze direction, and camera position. Include a portrait by a stone wall, a full-body street shot, a shot seated at a café table, a close-up three-quarter portrait, a walking shot, and a seated portrait. Present the plan as a table with 6 rows. Keep the outfit and overall visual style consistent.
You can use the generated plan instead of the suggested table. Check that the AI hasn't repeated the same pose several times.
If five shots show the person standing against a wall, ask the AI to replace two of them with a walking shot and a seated portrait.
Write a consistent base prompt for the entire series
In the “AI photo prompts: ready-to-use examples and tips” lesson, you learned to describe appearance, lighting, composition, and style. A photoshoot series uses the same structure, with one additional rule: part of the prompt stays unchanged.
Divide your prompt into two parts.
The fixed part defines appearance, clothing, location, lighting, color grading, and format. The variable part describes the specific pose, action, and framing.
The fixed part
For our example, use this base prompt:
Use the uploaded photo only as a reference image for the person's appearance. Preserve their recognizable face, eye shape, nose, lips, age, and hair color and length.
Outfit: a beige trench coat over a white shirt, light-colored straight-leg pants, neatly styled hair, and light, natural makeup.
Style: editorial city photoshoot, warm evening light, soft shadows, natural skin texture, and warm film-style color grading.
Vertical 3:4 aspect ratio, realistic photography, no text or watermarks.
Save this text. For each new image, add a description of one shot.
Six shot prompts
| No. | Add to the base prompt |
|---|---|
| 1 | Chest-up portrait beside an old stone wall, looking at the camera with a slight smile. Camera at eye level. |
| 2 | Full-body shot on a narrow street in the old town. Standing naturally with one foot slightly forward, arms relaxed at the sides, looking at the camera. |
| 3 | Sitting at a wooden table in an outdoor café. Waist-up shot, hands resting on the table near a cup, looking slightly to the side. |
| 4 | Close-up three-quarter portrait, head turned approximately 45 degrees. Looking over the shoulder with a soft, calm expression. |
| 5 | Walking along a cobblestone street, taking a step forward, trench coat slightly open. Framed to mid-thigh, natural movement. |
| 6 | Sitting on a stone bench near an old building. Waist-up shot, hands resting on the knees, looking at the camera with a slight smile. |
For the first shot, combine the base prompt with the first row of the table. For the second, use the same base prompt and replace only the final shot description.
Keep the outfit, color grading, and lighting consistent.
You don't need to add a long list of restrictions every time. If the model repeatedly makes a particular mistake, add one specific constraint.
Why a consistent base prompt works better
Suppose your first shot looks good, but the AI replaces the trench coat with a blazer in the third shot.
With a fixed prompt, you can immediately see that the outfit requirement is already there. You can reinforce it for the problematic shot without rewriting the entire prompt.
If every shot uses a separately written prompt with different wording, finding the cause of inconsistencies becomes harder.
Build a shot prompt using the builder. Start with the same base instruction, then choose the theme, outfit, location, lighting, and shot.
Generate your shots in the right order
Start with a chest-up portrait. The face occupies a large part of the image, making it easier to check facial similarity.
In Neuromia, open the image editor, choose a model, set the aspect ratio to 3:4, and attach your source image using the “Upload photo (optional)” field.
For this exercise, we'll use Nano Banana.
First shot: check the face and style
Generate a portrait beside a stone wall.
First shot: portrait by a stone wall
Use the uploaded photo only as a reference image for the person's appearance. Preserve their recognizable face, eye shape, nose, lips, age, and hair color and length. Outfit: a beige trench coat over a white shirt, light-colored straight-leg pants, neatly styled hair, and light, natural makeup. Style: editorial city photoshoot, warm evening light, soft shadows, natural skin texture, and warm film-style color grading. Vertical 3:4 aspect ratio, realistic photography, no text or watermarks. SHOT 1: chest-up portrait beside an old stone wall. The person looks directly at the camera with a slight smile. Camera at eye level. Preserve the person's recognizable facial features from the source image.
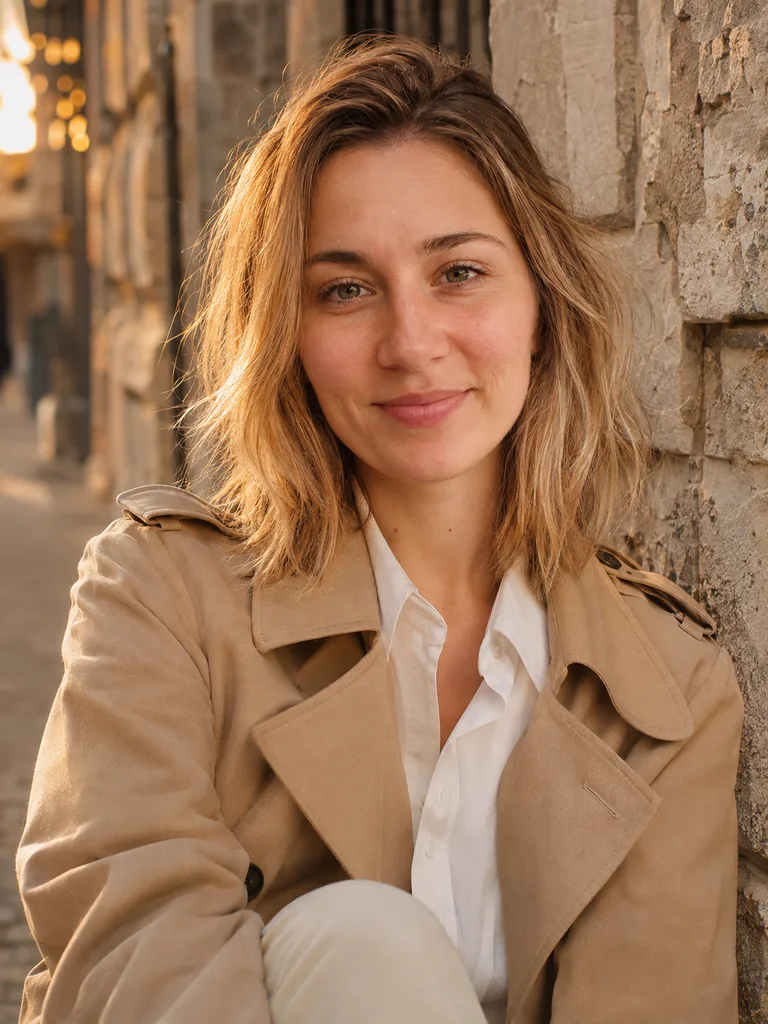
After generation, compare the result with the original. Check the shape of the eyes, nose, lips, and chin, along with the person's age and hair color.
Then check the concept: beige trench coat, white shirt, old town, and evening light.
If the face doesn't look like the original, follow the process from the “How to generate AI photos from text or your own pictures” lesson: return to the source image, clarify which features must be preserved, and regenerate.
If the face looks right but the lighting resembles harsh midday sunlight instead of evening light, adjust the lighting description.
Don't generate the entire series until the first shot meets the main requirements. Otherwise, the same mistake may appear in several images.
Second shot: change the composition
Now create a full-body street photo.
Use the same Nano Banana model and upload the original photo again. Don't replace the original with your first AI-generated portrait.
Keep the base prompt unchanged. Modify only the shot description.
Second shot: full-body photo
Use the uploaded photo only as a reference image for the person's appearance. Preserve their recognizable face, eye shape, nose, lips, age, and hair color and length. Outfit: a beige trench coat over a white shirt, light-colored straight-leg pants, neatly styled hair, and light, natural makeup. Style: editorial city photoshoot, warm evening light, soft shadows, natural skin texture, and warm film-style color grading. Vertical 3:4 aspect ratio, realistic photography, no text or watermarks. SHOT 2: full-body photo on a narrow cobblestone street in an old European city. The person stands naturally, with one foot slightly forward, arms relaxed at their sides, and eyes looking at the camera. The outfit and hairstyle match the description exactly. Preserve the person's recognizable facial features from the source image.
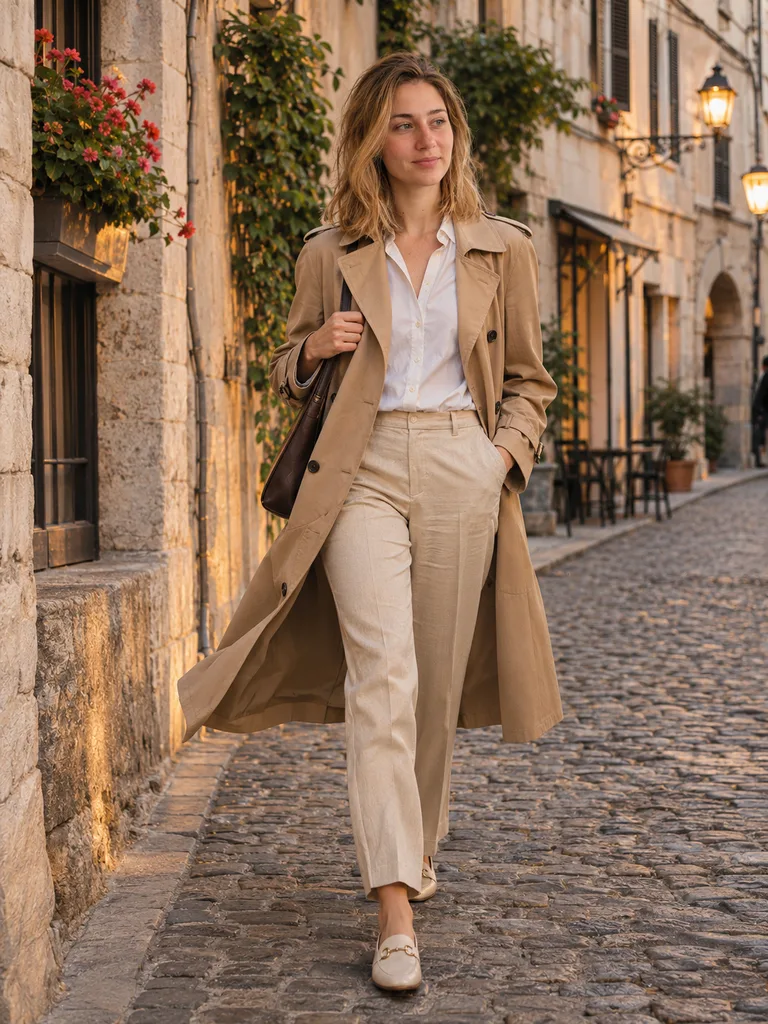
Compare the first two results side by side.
Do they look like the same person? Are the hairstyle, age, and outfit consistent? Does the lighting make both images look as if they were taken around the same time?
If you notice differences, fix the second shot before continuing.
The remaining shots
Follow the same process to create the café shot, three-quarter portrait, walking shot, and bench portrait.
After each generation, place the new image alongside the shots you've already approved. This makes it easier to notice if the hair becomes lighter in the fifth photo or the trench coat changes shape in the sixth.
How to keep facial features and style consistent across the series
The hardest part of an AI photoshoot is maintaining consistency between shots. With every generation, the model interprets the source photo and scene description again.
Follow four rules for your series.
- Attach the original photo to every independent generation request.
- Avoid switching models between shots unless necessary.
- Keep the fixed part of the prompt unchanged.
- Change the composition, not the entire concept.
The first rule is particularly important.
If you generate the second shot from the first, the third from the second, and continue this chain, small changes in appearance can accumulate.
For example, suppose the eyes become slightly larger in the first result. The second shot then uses those enlarged eyes as part of its new reference image. After several repetitions, the face may look noticeably different from the original.
When to use a generated shot
There's a difference between creating the next image and editing an existing one.
If you need a new camera angle, start with the original.
If a particular shot already looks good but you need to remove an unwanted object from the background, you can edit that result. Ask the model to preserve the face and everything else.
For small, targeted changes, use local editing if your chosen tool supports it.
One reference image or several?
If a single selfie isn't enough for a challenging camera angle, try adding a second original photo of the same person.
Another option is to use your first successful shot as a reference for clothing and color grading while keeping the original photo as the primary reference for facial features.
Clearly define the role of each image. This technique is covered in detail in the “AI photo prompts: ready-to-use examples and tips” lesson.
Support for multiple reference images depends on the model. For example, Nano Banana supports up to 10 reference images, as does Nano Banana 2.1.
Adding another reference image doesn't guarantee facial consistency. If the images start to conflict, return to a single high-quality source photo.
What to do when the series becomes inconsistent
First, determine how widespread the problem is.
If only one shot is wrong, regenerate that shot using the same base prompt.
If the outfit changes across several shots, strengthen the description of the fixed outfit and regenerate the affected images.
If almost the entire series shows a different face, check your source photo or try another model. In this case, it's better to restart the series than to fix every image individually.
After switching models, compare a new test shot with the original before generating the remaining images.
Ready-to-use AI photoshoot themes
For a different theme, replace the fixed part of the prompt. The process for building a series stays the same.
Each example below is designed for a separate photoshoot. Add a line describing the pose and camera angle.
Business photoshoot
Use the uploaded photo as a reference image for the person's appearance. Preserve their recognizable face, age, hairstyle, and natural proportions.
Professional business photoshoot in a bright studio. Navy blue blazer, white shirt, neutral interior with a large window. Soft daylight from the left, natural skin texture, and muted colors. Realistic photography, 3:4 aspect ratio.
Shot: [description].
Prepare a close-up portrait, a shot at a desk, a standing portrait, and a three-quarter view.
Editorial photoshoot
Use the original photo to preserve the person's face and age.
Editorial photoshoot in a minimalist studio. Elegant dark red suit, neatly styled hair, gray background, and soft directional studio lighting. Defined shadows, realistic skin texture, and natural fabric details. 3:4 aspect ratio.
Shot: [description].
Alternate between seated shots, standing shots, movement, and close-up portraits.
Casual city photoshoot
Use the uploaded photo as a reference image for the person's appearance. Preserve their recognizable face, age, and hairstyle.
Casual photoshoot on a quiet city street. Light-colored coat, dark pants, and a plain scarf. Stone building facades, small cafés, and soft overcast daylight. Natural colors, realistic photography, 3:4 aspect ratio.
Shot: [description].
Good options for the series include a walking shot, waiting beside a storefront, sitting on a bench, and a portrait at a café table.
Christmas and holiday AI photoshoot
Preserve the person's recognizable appearance from the uploaded photo.
Christmas photoshoot in a cozy living room. Dark green sweater, decorated Christmas tree, warm string lights, and wooden furniture. Soft lamplight, natural skin tones, realistic photography, 3:4 aspect ratio.
Shot: [description].
Create a portrait beside the Christmas tree, a shot on the sofa, and a photo holding a gift. For a single finished image, you can use the Christmas photo template.
Men's AI photoshoot
Use the uploaded photo of the man as a reference image for his appearance. Preserve his face shape, age, hairstyle, and beard or stubble if present in the original.
Men's photoshoot in a modern interior with a concrete wall and leather armchair. Plain dark shirt, black pants, soft side lighting, and muted gray-brown tones. Realistic photography, 3:4 aspect ratio, no heavy retouching.
Shot: [description].
Vary the body position, gaze direction, and framing. Don't artificially add a beard or change body proportions if the goal is to preserve the person's real appearance.
Couples photoshoot
Use the uploaded photos of two people as separate reference images for their appearances. Preserve each person's individual facial features and age.
Couples photoshoot in an autumn park. The first person wears a beige coat, the second a navy blue coat. Golden autumn leaves, soft evening light, and natural poses. Realistic photography, 3:4 aspect ratio.
Shot and positioning of both people: [description].
Start with shots where both faces are clearly visible. For the next image, you can add a scene of the couple walking hand in hand.
Family AI photoshoot
Use the family members' photos as separate reference images. Preserve the number of people, each person's individual facial features, age, and natural proportions.
Family photoshoot in a bright living room. Clothing in beige and gray tones, a sofa, a large window, and soft daylight. Natural facial expressions, realistic photography, 3:4 aspect ratio.
Positioning of family members: [description].
Start with a simple arrangement of the family members. For subsequent images, add seated poses and activities they do together.
Using multiple reference images without mixing up faces is covered in the “AI photo prompts: ready-to-use examples and tips” lesson.
Select your best shots and prepare the series for publishing
After generation, arrange all the results side by side. Looking at images individually makes it harder to judge how consistent they are as a series.
Evaluate your photos using three criteria.
| Criterion | What to check |
|---|---|
| Facial similarity | Face, eyes, age, hairstyle, and proportions |
| Consistency | Outfit, lighting, color grading, and accessories |
| Variety | Framing, poses, actions, and composition |
Inspect the images at full size. Pay attention to teeth when smiling, the number of fingers, hand anatomy, jewelry, and background objects.
Then reduce the photos to thumbnail size. If all six look almost identical, replace some with more distinctive compositions.
It can help to show a few results to someone who knows what you look like. They may notice changes in your facial features that you've overlooked after spending a long time reviewing the images.
How to fix a specific error
Suppose everything looks right in the café shot except for the hand next to the cup.
Instead of describing the entire scene again, use a targeted instruction:
Fix the right hand: five naturally shaped fingers, with the hand resting on the table beside the cup. Preserve the face, outfit, pose, lighting, and all other parts of the image.
If the AI changes the face while fixing the hand, discard that edit and regenerate the original shot with a simpler hand position.
If the skin looks too smooth in a portrait:
Remove excessive skin smoothing. Preserve natural skin texture, skin tone, and age. Do not change the shape of the eyes, nose, lips, or chin.
Don't try to fix ten different problems in a single prompt. After each edit, check whether anything else in the image has changed.
When your series is finished
Stop when you have six shots that match your plan and pass all three evaluation criteria.
Every pixel doesn't need to match perfectly. Small differences in clothing folds and hair position are natural across different photographs. Noticeable changes in age, face shape, or outfit are not acceptable when you're creating one consistent photoshoot.
Save your final images at the highest available quality. For publishing, use the original generated file rather than a screenshot.
Choose an aspect ratio that matches where you'll use the image. A square profile picture works well at 1:1, a vertical post at 3:4, and a horizontal cover image at 16:9.
When cropping, leave some space around the head and hands. If the face is too close to the edge, a platform's automatic cropping may cut off important details.
If the final image isn't sharp enough, use the photo enhancement template or upscaling. Increasing resolution doesn't guarantee that facial features will be restored correctly, so check the processed result.
Common problems with AI photoshoot series
| Problem | What to do |
|---|---|
| The face changes between shots | Return to the original photo, use the same model, and keep the base prompt consistent. |
| All shots look similar | Revise your shot list. Add full-body shots, movement, and interaction with the surroundings. |
| Plastic-looking skin | Remove heavy retouching and ask the model to preserve natural skin texture. |
| Extra fingers | Simplify the hand pose or try local editing. |
| The person looks older or younger | Regenerate the shot from the original photo and explicitly specify that the person's age must remain unchanged. |
| The outfit or background changes | Strengthen the fixed part of the prompt without rewriting the entire style description. |
| The model refuses the request | Review the prompt and moderation rules, and replace potentially problematic wording with neutral descriptions. |
If a model rejects your request, the reason may be related to the image content or restrictions on editing people's appearances.
Start with a simple portrait without potentially problematic changes. If that is also rejected, check the rules of your chosen tool. Don't try to bypass moderation restrictions.
How much does an AI photoshoot cost in Neuromia?
For a series of 6–8 images, you can calculate the base credit cost in advance.
The cost per generation depends on the model. Additional attempts increase the total cost.
| Model | 6 shots | 8 shots |
|---|---|---|
| Flux 3 Klein | 10.56 | 14.08 |
| Nano Banana | 26.4 | 35.2 |
| Nano Banana 2.1 | 26.4 | 35.2 |
| Flux 2 Pro | 33 | 44 |
| GPT Image 2.5 | 39.6 | 52.8 |
| Nano Banana Pro | 118.8 | 158.4 |
Prices are in credits and reflect the base generation cost. For example, one shot with Nano Banana costs 4.4 credits, while six shots cost 26.4 credits.
But six generations won't always produce six usable photos.
Suppose you want six final shots and allow three additional attempts to fix unsuccessful results.
With Nano Banana, nine generations would cost 39.6 credits. With Flux 3 Klein, they would cost 15.84 credits.
These are example calculations, not predictions of how many errors you'll encounter. Sometimes every shot works on the first attempt. Other times, you'll need more retries.
In the Neuromia editor, you can choose 1K, 2K, or 4K quality and see the price before generating. Check the cost of your specific settings.
For final processing, Recraft upscaling is available for 0.55 credits and Topaz for 11 credits. Don't upscale every draft. Select your final shots first.
You can plan your photoshoot for free in the Mia AI chat. Image generation is charged separately according to the selected model's pricing.
If you're looking for a free AI photoshoot, check the terms of each tool. Free AI chat, trial access, and free image generation are different features.
AI photoshoot safety
Use your own photos or photos of people who have agreed to have images created using their appearance.
For couples and family photoshoots, discuss the intended results and their publication with everyone involved.
Photos of children require extra care. Don't upload images containing personal documents, home addresses, school information, or other unnecessary personal details. Follow the restrictions of your chosen model.
Don't present an AI-generated photo as documentary evidence of a real event. If an image shows someone visiting a place they've never been to, it doesn't prove the trip happened.
For a résumé, choose a realistic portrait that matches your actual appearance. You can use the résumé photo template.
For passports, ID cards, and other official documents, use photographs that meet the requirements of the issuing authority. AI-generated or substantially altered images may not be accepted.
Test your knowledge
Four scenarios will help you check whether you can keep a photoshoot series consistent and fix mistakes without repeating all your work.
AI photoshoot checklist
Frequently asked questions
How many photos of myself do I need to upload?
One high-quality, front-facing photo is enough to start. Additional three-quarter or full-body source photos can help with challenging camera angles if the model supports multiple reference images. You don't need to upload a large collection of photos for standard image generation from a reference photo.
Can I create an AI photoshoot for free?
Free image generation depends on the tool and its terms. In Neuromia, you can plan your photoshoot for free with Mia. Image generation costs are displayed before you start. Don't confuse free prompt preparation with free generation of an entire series.
Why does AI change my face?
The model may interpret the source image inaccurately when handling challenging camera angles, stylization, or repeated use of AI-generated images. Return to the original photo, keep your base prompt consistent, and check the first shot. You'll find detailed ways to improve facial similarity in the “AI photo prompts: ready-to-use examples and tips” lesson.
How do I create a men's AI photoshoot?
Follow the same process: one source photo, a consistent outfit, and different shots. In the base prompt, specify the hairstyle, age, and beard or stubble if present in the original photo. You'll find an example in the ready-to-use photoshoot themes section.
Can I create an AI photoshoot with my child?
This depends on the model's rules and whether you have the necessary rights and consent to use the photos. For a family series, prepare separate reference images for each participant and check everyone's appearance. Don't upload unnecessary personal information about your child.
Can I use AI-generated photos for my résumé or official documents?
For a résumé, choose an image that reflects your actual appearance and suits a professional setting. For official documents, follow the requirements of the relevant authority. AI-generated images may not meet those requirements.
How many shots should I create?
Six different compositions are enough for your first series. For a personal website or social media, you can plan 8–10 shots. Generate additional versions only when an existing result doesn't match your plan.
What to learn next
Save your base prompt and the six-shot table. In the next lesson, “How to create product listing images with AI,” you'll apply the same approach to product photography.
Instead of preserving facial features, you'll need to maintain the product's shape, color, packaging, and other identifying details. You'll show the same product from different camera angles and in different scenes while keeping its appearance recognizable.
Before moving on, finish your AI photoshoot: generate six consistent images, remove unsuccessful results, and prepare your final files for publishing.
Return to the AI course curriculum.