How to generate AI photos from text or your own pictures
Learn to generate images from text and edit your own photos with AI. Choose a model, upload a photo, set the aspect ratio and quality, write a prompt, and fix unwanted results. Complete two hands-on exercises using ready-made prompts.
To generate an AI photo, open the image editor, choose a model, and describe what you want to create. If you want to edit your own photo, upload it first.
For example, you can generate an outdoor café scene from a text description. Or you can upload a casual portrait and ask AI to change the clothing, background, and lighting.
The first method doesn't require a source photo. With the second method, the result also depends on the quality of the uploaded photo and how well the model preserves the details you want to keep.
In this lesson, you'll try both methods, learn the difference between 1:1, 3:4, and 16:9 aspect ratios, choose a model based on your task, and fix common mistakes.
Two ways to create AI photos
Generate an image from scratch
An AI model takes your text description and generates a new image. You can describe an interior, object, landscape, or fictional person.
For example:
A small outdoor café on a quiet European street in the evening. Wooden tables, warm light glowing through the windows, wet cobblestones after rain. Realistic photography, vertical 3:4 aspect ratio. No people or text.
The model decides how to arrange objects and fills in details you haven't specified. If you want a sign in a particular color or a table in a specific position, add those instructions to your prompt.
This method works well for illustrations, interior design concepts, fictional characters, and visual ideas.
Edit your own photo
Upload a source photo and describe the changes you want.
You can replace the background behind a person, change their clothing, create a studio-style portrait, or turn a photo into an illustration.
For example:
Use the uploaded photo as the source image. Preserve the person's face, age, hairstyle, and natural proportions. Replace their clothing with a white shirt and the background with a light beige studio backdrop. Soft lighting from the left, realistic photography.
In this case, the AI model must use the source image as a reference. However, preserving facial features isn't guaranteed: the model may change the person's face or other details.
If you want to create a recognizable portrait of yourself, start with a clear source photo and limit the number of changes.
How to generate your first image from text
For your first attempt, we'll generate an outdoor café scene. You won't need a source photo.
You can open the Neuromia editor without signing up to explore the available models and settings. You'll need an account when you're ready to generate an image.
Step 1. Open the editor and choose a model
Go to the image generator.
The model selector has three tabs: "Recommended," "All models," and "Favorites." The Recommended tab contains suggested starting options, while All models shows the full selection of image generators.
For your first image, choose Flux 3 Klein. With a base cost of 1.76 credits, it's an affordable option for experimenting.
GPT Image 2.6 Sunburst is also available in the editor and has a “For beginners” label. Its starting cost is 8.8 credits at 1K.
Step 2. Write your prompt
Describe the scene in the prompt field. Use this ready-made example:
A small outdoor café on a quiet European street in the evening. Wooden tables under an awning, warm light glowing through the windows, wet cobblestones after rain with subtle reflections of streetlights. Realistic photography, natural colors, vertical 3:4 aspect ratio. No people, text, or watermarks.
The prompt specifies the location, main objects, lighting, and aspect ratio. The model can fill in minor environmental details on its own.
If you're writing a prompt for the first time, start with the lesson How to write AI prompts: a step-by-step guide. It covers prompt structure, constraints, and ways to refine your results.
Step 3. Choose the image aspect ratio
The editor may default to a square 1:1 format. Check the aspect ratio before generating.
| Aspect ratio | Best for |
|---|---|
| 1:1 | Square profile pictures, product images, general-purpose illustrations |
| 3:4 | Vertical portraits, full-body photos, subjects with surrounding details |
| 9:16 | Vertical images for phone screens and Stories |
| 16:9 | Horizontal landscapes, cover images, wide interior shots |
The aspect ratio describes the proportions of an image, not its pixel dimensions.
Choose 3:4 for the café. A vertical composition gives you room to show the tables in the foreground and part of the building behind them.
A 16:9 format would work better for a panoramic street scene.
Step 4. Check the image quality
Depending on the model, the editor offers 1K, 2K, or 4K resolution.
Resolution determines the number of pixels in the finished image. Higher resolution can be useful for large images and further editing, but it doesn't guarantee correct anatomy, text, or composition.
For your first test, 1K is usually enough to evaluate the scene, provided the selected model supports it.
Once you're happy with the result, you can consider generating a higher-resolution version. Always check the price before starting: it may change when you select a different quality setting.
Step 5. Check the cost and start generation
The editor displays the cost before you start. You'll need to register if you're using Neuromia for the first time.
After registration, Neuromia adds 10 bonus credits to your account. Generating an image with Flux 3 Klein under the specified settings costs 1.76 credits.
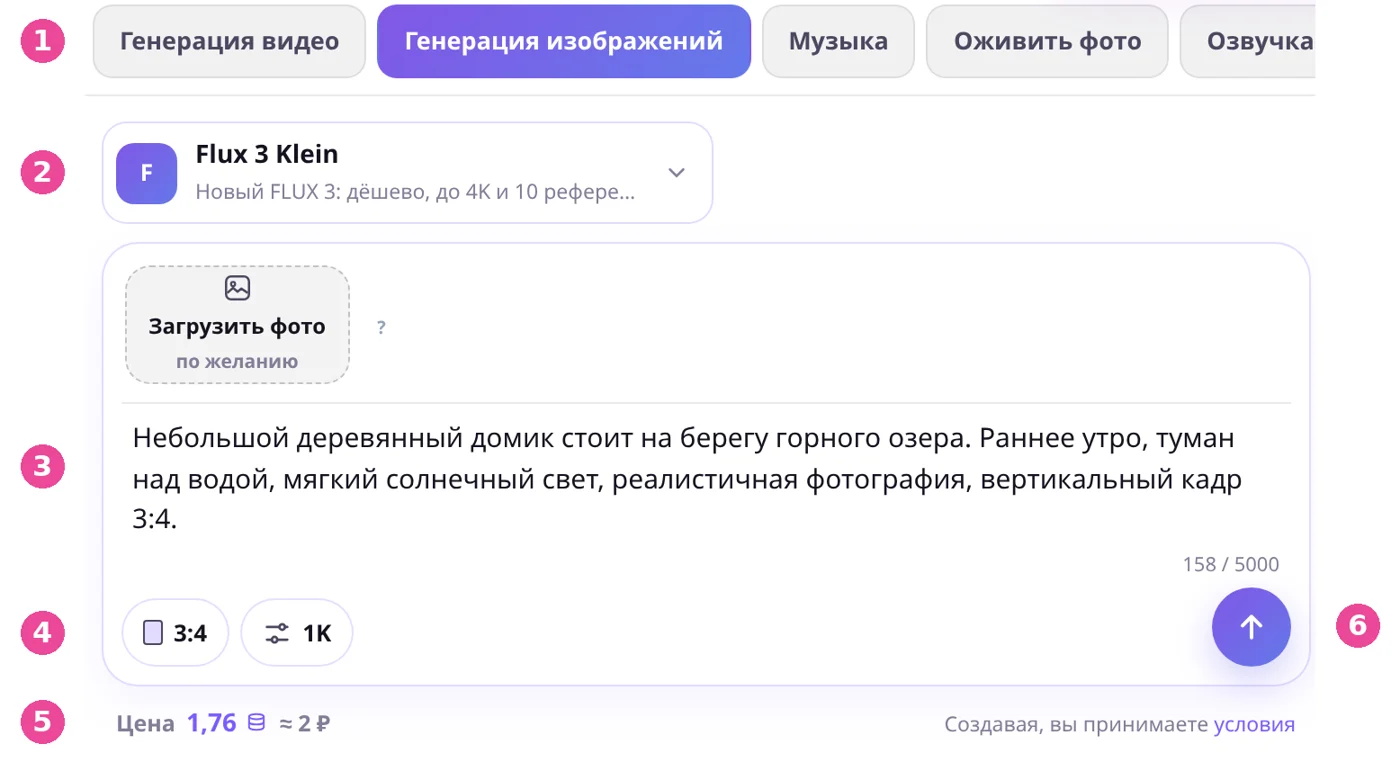
After starting, check the editor for the task's completion status. Don't submit the same prompt again before checking whether the first generation is still running.
Step 6. Evaluate the image
Compare the result with your original prompt.
For the café, check whether the image includes wooden tables, evening lighting, and wet cobblestones. Make sure the image has the requested vertical aspect ratio.
If the café appears too far away, add:
The café occupies the center of the frame. The tables are clearly visible in the foreground.
If the image is too dark, clarify the lighting:
Warm light from the windows illuminates the tables and part of the street. The café details are clearly visible.
Generating again produces a new variation. The model may not preserve every detail you liked in the previous image.
Exercise 1. Generate an image from text
Generate a realistic photo of an outdoor café in the evening. The scene should include wooden tables, warm window lighting, and wet cobblestones.
Use Flux 3 Klein with a 3:4 aspect ratio. You don't need to upload a photo.
Your first image: an outdoor café in the evening
A small outdoor café on a quiet European street in the evening. Wooden tables under an awning, warm light glowing through the windows, wet cobblestones after rain with subtle reflections of streetlights. Historic building facades in the background, slightly blurred. Realistic photography, natural colors, soft evening lighting, vertical 3:4 aspect ratio. No people, text, or watermarks.
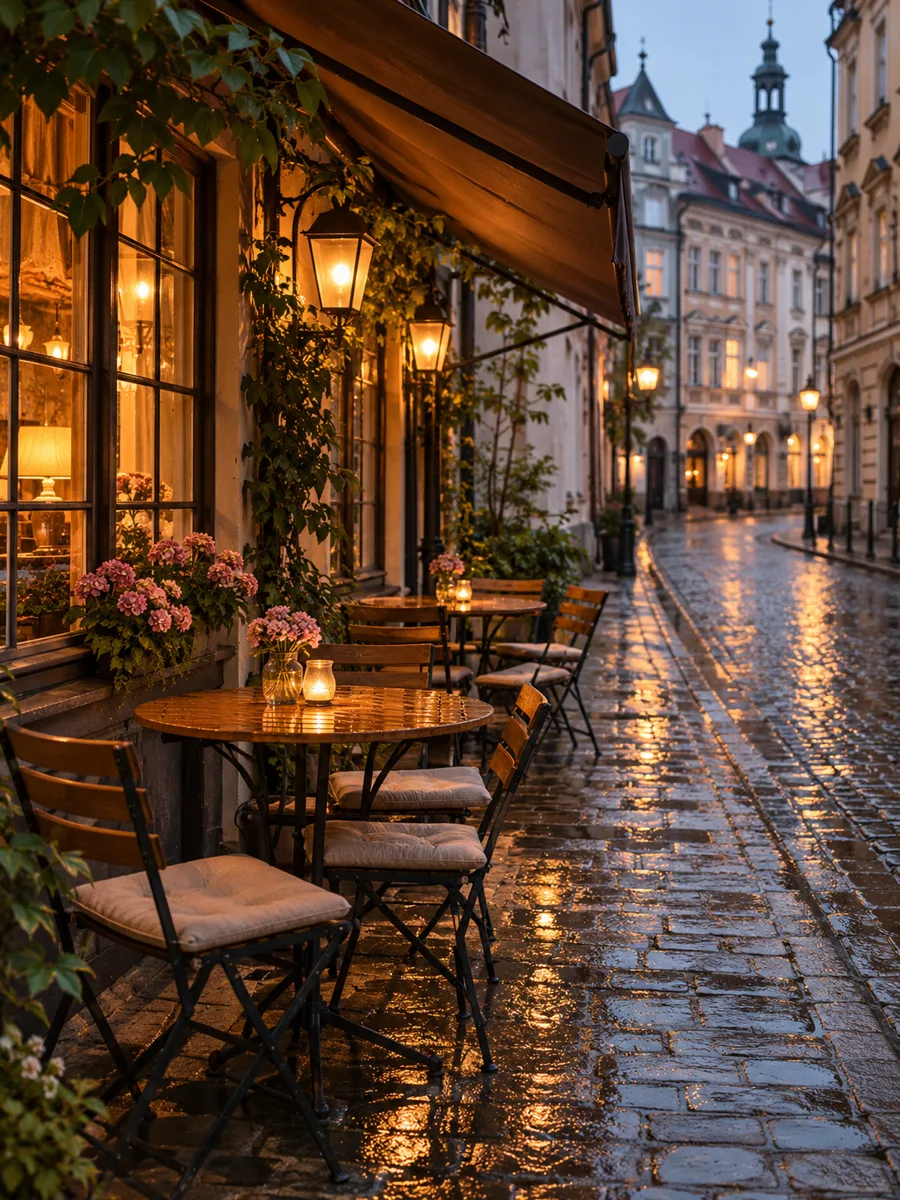
After generation, compare the result with your original description.
If the model adds people despite the "No people" instruction, try simplifying the scene and repeating that constraint once at the end of the prompt.
If the reflections look too bright, replace "reflections of streetlights" with "subtle, natural reflections on wet cobblestones."
Keep your original prompt. You'll need it if you want to compare results from different models.
How to turn your own photo into a professional-looking portrait
When editing your own photo, start with a straightforward change. For example, turn a casual photo taken at home into a studio portrait.
In this scenario, the goal is to preserve the person's recognizable appearance while changing the surroundings.
Step 1. Prepare your source photo
Choose a photo where the face is clearly visible. Ideally, it shouldn't be obscured by hair, a hand, or other objects.
Heavy blur makes it harder to preserve fine details. If the face takes up only a small part of the photo, the model may also struggle to reproduce it accurately.
For your first attempt, use a photo of one person. Save more complex group photos for a separate exercise.
You don't need a professional photograph. A regular phone photo will work as long as the facial features are clearly visible.
Step 2. Upload your photo to the editor
Open the image editor and use the "Upload photo (optional)" field.
Select the source photo from your device. After uploading, confirm that the correct image appears in the editor.
For photo editing, choose a model that supports source images.
Two options to start with are Nano Banana 2.1 at 4.4 credits and GPT Image 2.6 Sunburst at 8.8 credits.
Both models support reference images. Results depend on the source photo and the type of changes you're making, so neither model is universally better.
Step 3. Specify what to preserve and what to change
Split your requirements into two parts.
First, describe what should stay the same: the person's face, age, hairstyle, and natural proportions.
Then specify what should change: clothing, background, and lighting.
Turn my photo into a beautiful professional portrait.
Use the uploaded photo as the source image. Preserve the person's face, eye shape, nose, lips, age, hairstyle, and natural proportions. Replace their clothing with a plain white shirt without patterns. Use a light beige studio background. Soft lighting from the left, camera at eye level, chest-up portrait. Natural skin texture, realistic photography, vertical 3:4 aspect ratio. Do not add jewelry or other people.
The second prompt gives the model specific constraints. However, even detailed instructions can't guarantee an exact facial match with the original photo.
Step 4. Evaluate the edited photo
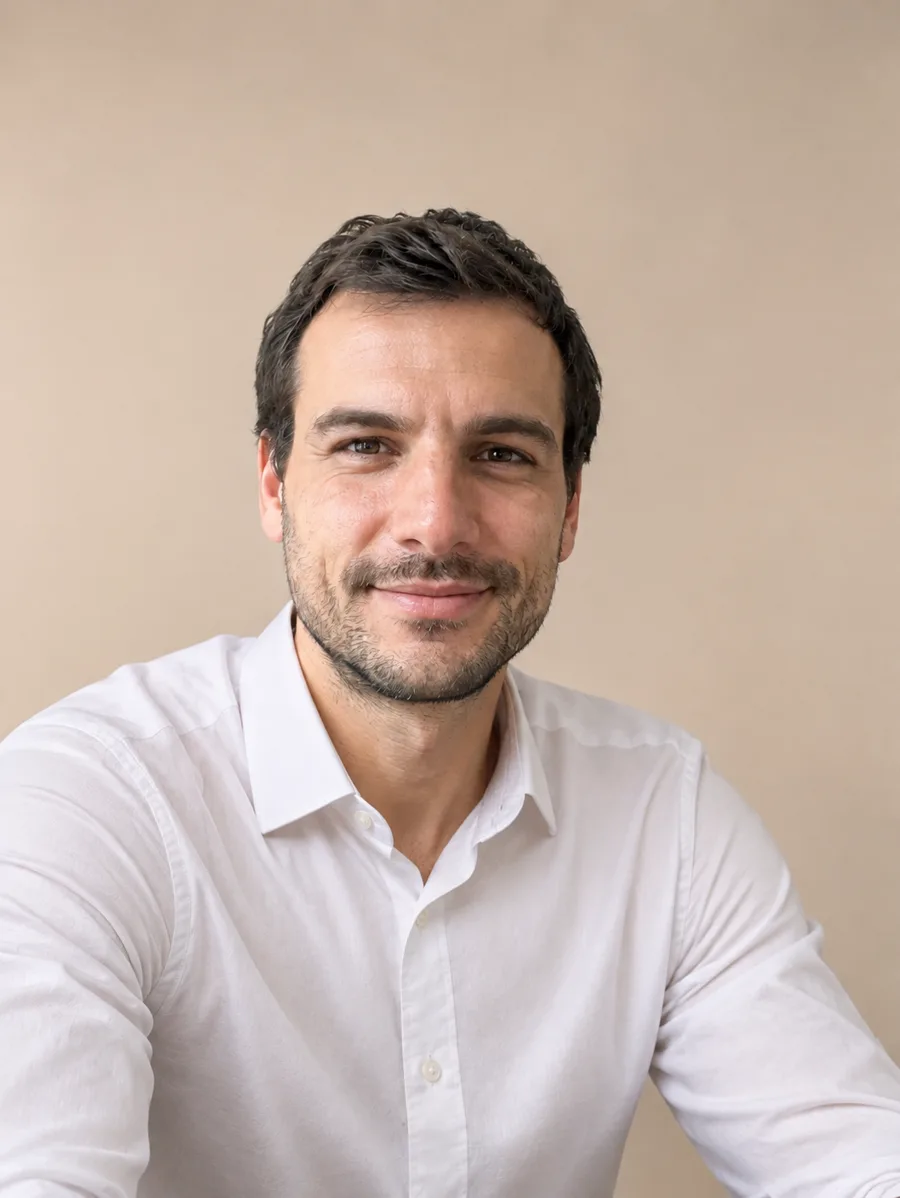
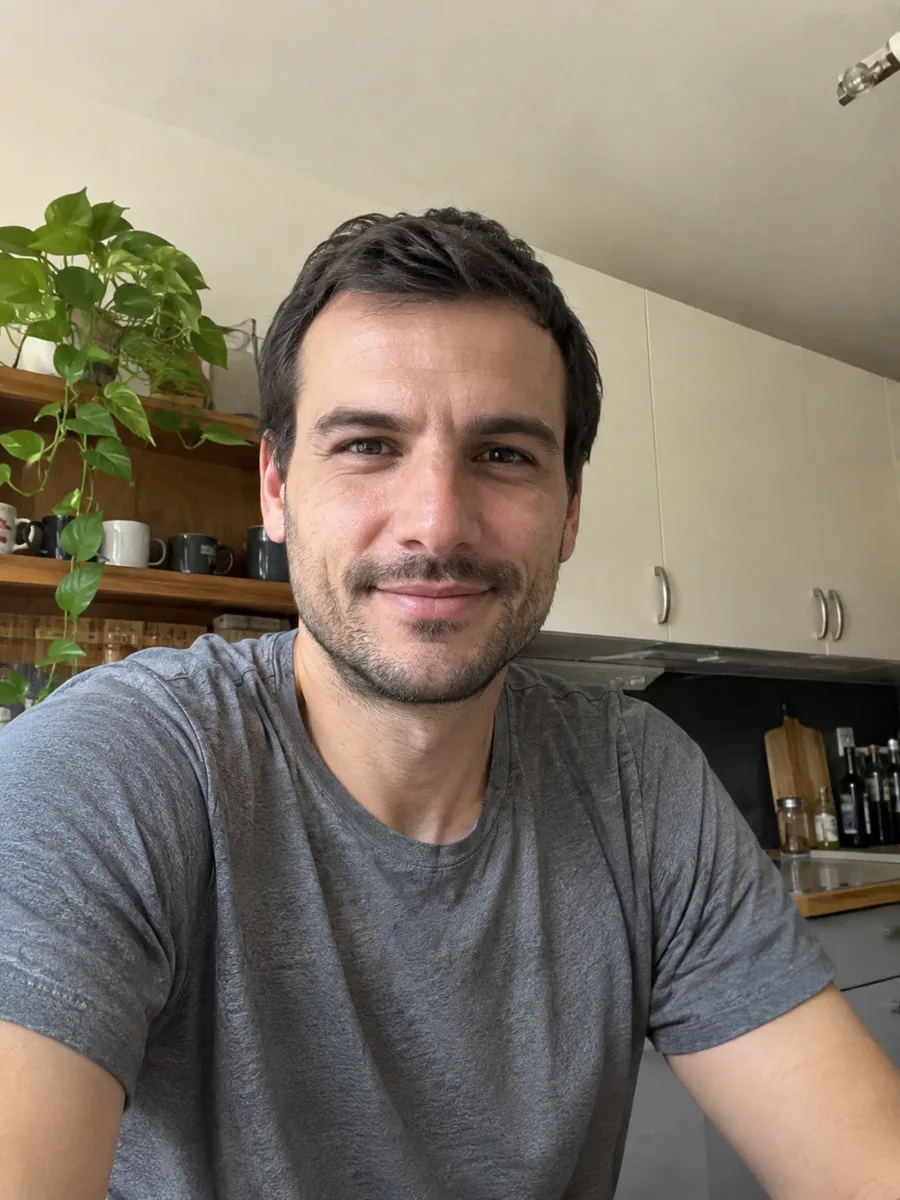 beforeafter
Compare the generated portrait with the source photo.
Check whether the facial features, age, and hairstyle have been preserved. Then look at the clothing and background: they should match your instructions.
If only the shirt color is wrong, clarify the color without changing the other requirements.
If the face looks noticeably different, don't accept the result just because the lighting looks good. Try reducing the number of changes or switching to another model.
The course includes a separate lesson, "How to create an AI photoshoot with your own face." It covers preserving facial features, choosing source photos, and creating multiple images with a consistent appearance.
Exercise 2. Create a studio portrait from your own photo
Choose a photo where the face is clearly visible. Use your own picture or a photo of someone who has given you the necessary permission to edit it.
Your task is to preserve the person's appearance, replace their clothing with a white shirt, and create a portrait against a light beige studio background.
This exercise uses Nano Banana 2.1. The base generation cost is 4.4 credits.
My photo: a studio portrait
Use the uploaded photo as the source image. Preserve the person's face, eye shape, nose, lips, age, hairstyle, and natural proportions. Replace their clothing with a plain white shirt without patterns. Use a light beige studio background. Soft lighting from the left, camera at eye level, chest-up portrait. Natural skin texture, realistic photography, vertical 3:4 aspect ratio. Do not add jewelry or other people.
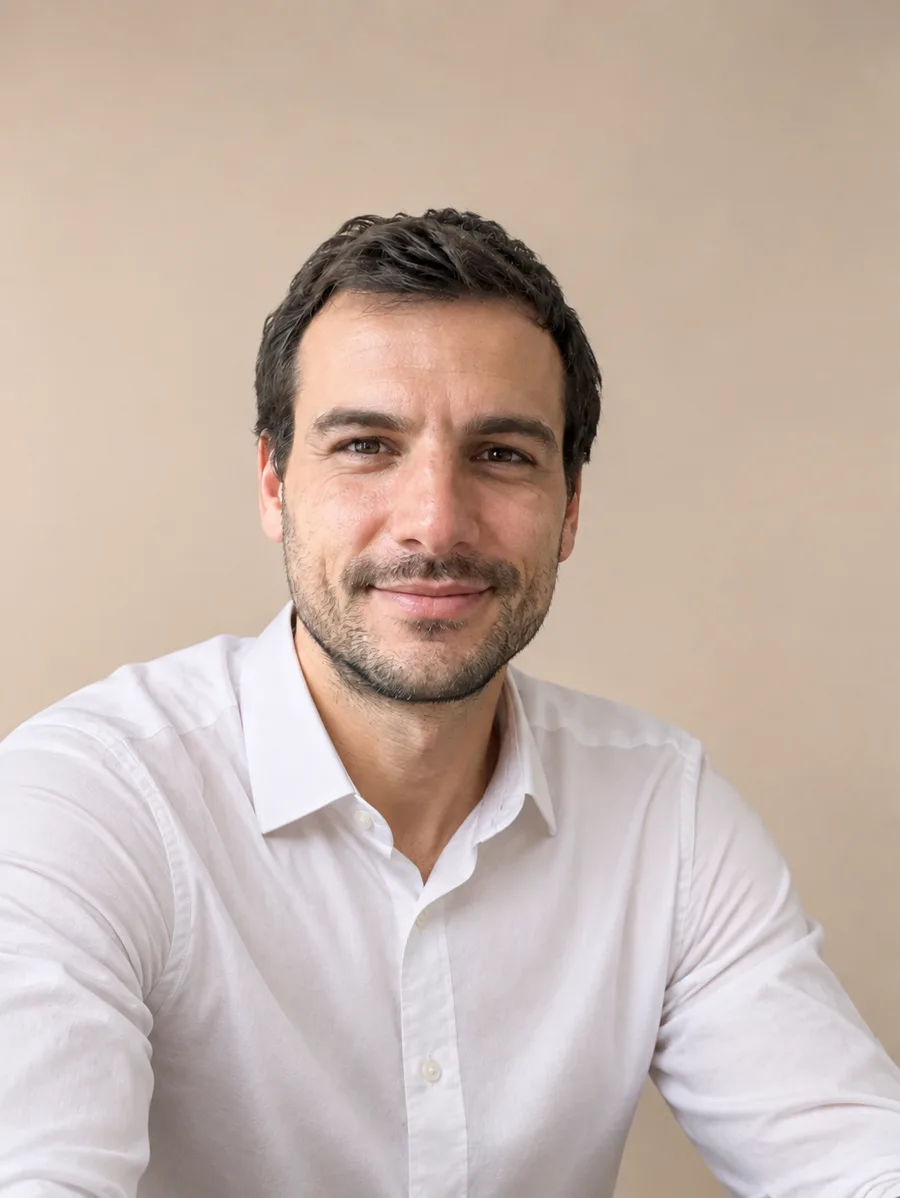
After generation, check that the face remains recognizable, the shirt is white, and the background is light beige.
If the face doesn't match, return to the source photo. For your next attempt, try changing only the background without changing the clothing and lighting at the same time.
Don't use the AI-generated image as official proof of someone's appearance.
Which AI model should you choose for photos?
The Neuromia editor offers several AI models with different capabilities and costs.
For your first choice, focus on what you want to create. The table below is not a quality ranking.
| Model | Starting cost | When to consider it |
|---|---|---|
| Z-Image | 0.88 credits | Affordable text-to-image generation |
| Flux 3 Klein | 1.76 credits | First experiments, different aspect ratios and resolutions |
| Ideogram V3 | 3.85 credits | Images containing text that needs to be checked |
| Nano Banana 2.1 | 4.4 credits | Image generation and editing with source photos |
| GPT Image 2.6 Sunburst | 8.8 credits | Generating images from detailed descriptions and precise photo editing |
| Seedream 5 Pro | 7.7 credits | Another option for image generation and editing |
These are base prices for a single generation. The actual cost may depend on your settings. Check the price in the editor before starting.
Flux 3 Klein supports resolutions from 1K to 4K and up to 10 reference images. Prompts can be up to 5,000 characters long.
Nano Banana 2.1 supports up to 10 reference images and a prompt limit of 20,000 characters.
GPT Image 2.5 supports up to 16 reference images and resolutions from 1K to 4K.
A reference image is a picture that the model uses as additional visual guidance. It might be a source photo of a person or an example of the look you want.
Adding more reference images doesn't necessarily improve the result. One source photo is enough for your first editing attempt.
If the model misunderstands your instructions, check the prompt first. If the same problem persists after several targeted revisions, try another model with the features you need.
The fastest method: ready-made templates
For common tasks, you can use the Neuromia template catalog.
Each template provides a prepared editing workflow. You choose the task and upload a photo if needed.
| What you want to do | Template |
|---|---|
| Remove the surroundings from a person or product | Remove background |
| Improve a blurry image | Enhance photo quality |
| Restore an old, damaged photo | Photo restoration |
| Turn a photograph into an illustration | Photo to illustration |
| Create an anime version of a photo | Photo to anime |
| Create a professional headshot | Resume headshot |
| Combine photos of two people | Two people in one photo |
| Extend the image beyond its original boundaries | Expand photo |
For background removal, choose a source image with a clearly defined subject. Complex edges, transparent details, and individual strands of hair may not be processed accurately.
When restoring an old photograph, check faces and small objects. AI may invent details that weren't present in the original.
If you combine two portraits, remember that the resulting image does not prove the people actually met.
Templates save you time writing prompts, but you still need to check the result.
How much does AI photo generation cost?
Neuromia uses credits to pay for generations. You receive 10 bonus credits when you register.
That's enough to complete both exercises in this lesson at the specified base prices:
| Operation | Cost |
|---|---|
| Text-to-image generation, Flux 3 Klein | 1.76 credits |
| Editing your own photo, Nano Banana 2.1 | 4.4 credits |
| Total for two generations | 6.16 credits |
| Remaining bonus credits | 3.84 credits |
This calculation assumes one successful generation for each exercise and no other credit usage.
If you want to test several versions of a prompt first, use a less expensive model when its capabilities are suitable for the task.
Once you've used your bonus credits, you can purchase a credit package. The smallest package costs 99 ₽.
Neuromia accepts payments in Russian rubles using supported payment methods.
How to avoid wasting credits on trial and error
Check your prompt, aspect ratio, and price before starting.
If the first image doesn't meet your requirements, identify the specific problem. Don't run several identical generations in a row without revising the prompt.
For inexpensive experiments, you can start with Z-Image at 0.88 credits or Flux 3 Klein at 1.76 credits, provided they support your task.
If generation fails because of a technical error, reserved credits are automatically refunded. If the model successfully generates an image but you don't like the result, the credits are not refunded.
Common AI photo generation mistakes
The model refused your prompt
A refusal may be caused by the model's content rules rather than a technical problem.
Restrictions often apply to editing photos of real people, public figures, explicit imagery, and other sensitive subjects.
If you request a controversial scene featuring a recognizable person, the model may reject it.
Don't try to bypass restrictions with disguised wording. For a permitted fictional scene, use an original character rather than copying a real person's identity.
Before editing someone else's photos, make sure you have the necessary consent.
AI added extra objects
You asked for one lamp on a table, but the model generated several.
Specify the number of objects and their surroundings:
One desk lamp in the center of a wooden table. No other lamps in the frame. Neutral background.
If the scene is overloaded with details, remove secondary objects from your prompt.
The main subject is too small
The model may place a person or object too far from the camera.
Specify how much of the frame the subject should occupy:
The object fills most of the frame. The camera is positioned at the object's height, with an angled view.
For a portrait, you can specify "chest-up portrait" or "close-up of the face."
The lesson AI photo prompts: ready-to-use examples and tips covers camera angles and framing in more detail.
Distorted hands and fingers
When generating people, inspect their hands, finger count, and hand positions.
If the model makes a mistake, simplify the pose. For example, instead of requesting a complicated hand gesture, ask for the person's arms to rest naturally at their sides.
You can also try a different model. Adding more detailed instructions doesn't guarantee anatomically correct results.
Incorrect text in the image
Image generators can make spelling mistakes, especially on small signs or with longer text.
If you need text in the image, specify the exact wording and check the result manually.
Ideogram V3 is an option worth considering for images with text. However, choosing this model doesn't guarantee correct spelling.
If the text must be legally or commercially accurate, it's safer to add it separately in a graphics editor.
The face changed during editing
If you ask the model to change the background, clothing, and lighting at the same time, it may redraw the face.
Specify that the person's appearance must stay the same. For the next attempt, reduce the number of changes.
If the face remains unrecognizable, try a different source photo or another model that supports photo editing.
A separate lesson on AI photoshoots covers more precise methods for preserving a person's identity and working with multiple photos.
Limitations: which AI photos should not be treated as real?
Passport and official ID photos
AI can generate a portrait with a plain background and appropriate clothing. However, generative editing may alter facial features.
For passports, visas, and other official documents, use a real photograph that meets the issuing authority's requirements.
Don't assume that a realistic AI-generated portrait is suitable for identity verification.
Photos with celebrities
AI models may restrict image generation involving real public figures, especially when the prompt describes a controversial or misleading situation.
Even if a model allows a fictional scene, don't present the resulting image as evidence of a real meeting or event.
Before publishing, consider consent, image rights, and the risk of misleading viewers.
How to tell if a photo was generated by AI
No single visual clue can reliably establish whether an image was AI-generated.
Mistakes involving fingers, reflections, text, or small objects may raise suspicion. However, modern models can generate images without obvious defects, and real photographs can also look unusual.
If an image's origin matters, check the original source of the publication, any available source files, and information about the image's history.
Metadata and provenance markers can help when available, but their absence doesn't prove that a photograph is real.
Don't label an image AI-generated simply because the lighting looks unusually even.
Can you animate an existing photo?
To add movement to a still photograph, you need a video generator. This is a separate workflow.
Neuromia has an Animate photo tool that lets you create a short video from an image.
What to check before generating
Test your knowledge
Answer questions about choosing a generation method, working with source photos, correcting results, and understanding model limitations.
If you answered the question about preserving facial features incorrectly, repeat the second exercise with a simpler change. If you made a mistake about aspect ratios, review the aspect ratio table.
What to learn next
For your next generation, choose a task of your own. For example, create a product photo for an online marketplace listing or try replacing the background in one of your pictures.
Save your prompt and the generated image. After the first attempt, change one requirement and compare the results.
The next step is learning to control your results more precisely. The lesson AI photo prompts: ready-to-use examples and tips covers lighting, lenses, composition, camera angles, and style. It also includes a catalog of ready-to-use prompts organized by topic.
If you want to create images featuring your own face in different looks, the course includes a separate lesson, How to create an AI photoshoot with your own face. It covers choosing source photos and preserving facial features across multiple generations.
Explore other topics in the Neuromia learning program.
Frequently asked questions
Can I generate AI photos for free?
Neuromia gives you 10 bonus credits after registration.
You can use them to generate five images with Flux 3 Klein at 1.76 credits each or two images with Nano Banana 2.1 at 4.4 credits each, if you spend the entire bonus on one model.
Free usage terms vary between services. Check the limits of the specific tool you want to use.
How do I generate AI photos on my phone?
Open the image editor in your phone's browser.
To generate an image from scratch, enter a prompt and choose a model. To edit your own picture, upload a photo from your device.
Then check the aspect ratio, quality, and price before starting.
What's the best AI model for generating photos?
It depends on your task.
For affordable text-to-image generation, Flux 3 Klein is a good starting point. For editing a source photo, consider Nano Banana 2.1 or GPT Image 2.6 Sunburst.
If you're unhappy with the result, check your prompt and source photo, then compare suitable models using the same task.
Can I use AI to create a passport photo?
You should not use a generative AI portrait for an official document. AI may alter your appearance even when instructed to preserve your face.
Take a real photograph that meets the requirements of the authority processing your application.
How can I make a professional-looking photo of myself with AI?
Upload a clear photo where your face is easy to see. Specify which facial features and other details should remain unchanged, then describe the clothing, background, and lighting you want.
Start with one look. After generation, compare your face with the original photo.
A separate lesson on AI photoshoots covers creating a consistent series of portraits.
How can I combine photos of two people?
You can use the Two people in one photo template.
Prepare the source photos and make sure you have permission to edit them.
After generation, compare both people's appearances with their original photos. Don't present the generated image as a photograph of a meeting that actually happened.
How can I tell if a photo was created by AI?
Check the original publication source and any available information about the image's origin.
Anatomical errors, incorrect text, or unusual reflections may be signs of AI generation, but they aren't reliable proof.
If you need to verify authenticity, a visual inspection alone isn't enough.
Can I generate a photo with a celebrity?
It depends on the model's rules and the nature of your prompt. Some image generators refuse requests involving public figures.
Don't create misleading images that could be mistaken for evidence of real events.
For a fictional scene, you can use an original character.