AI photo prompts: ready-to-use examples and tips
AI photo prompts are text instructions that tell a model how to generate an image or edit an uploaded photo. Explore ready-to-use prompts for photoshoots, portraits, family pictures, and photo editing. Copy any example or try it in the Neuromia editor.
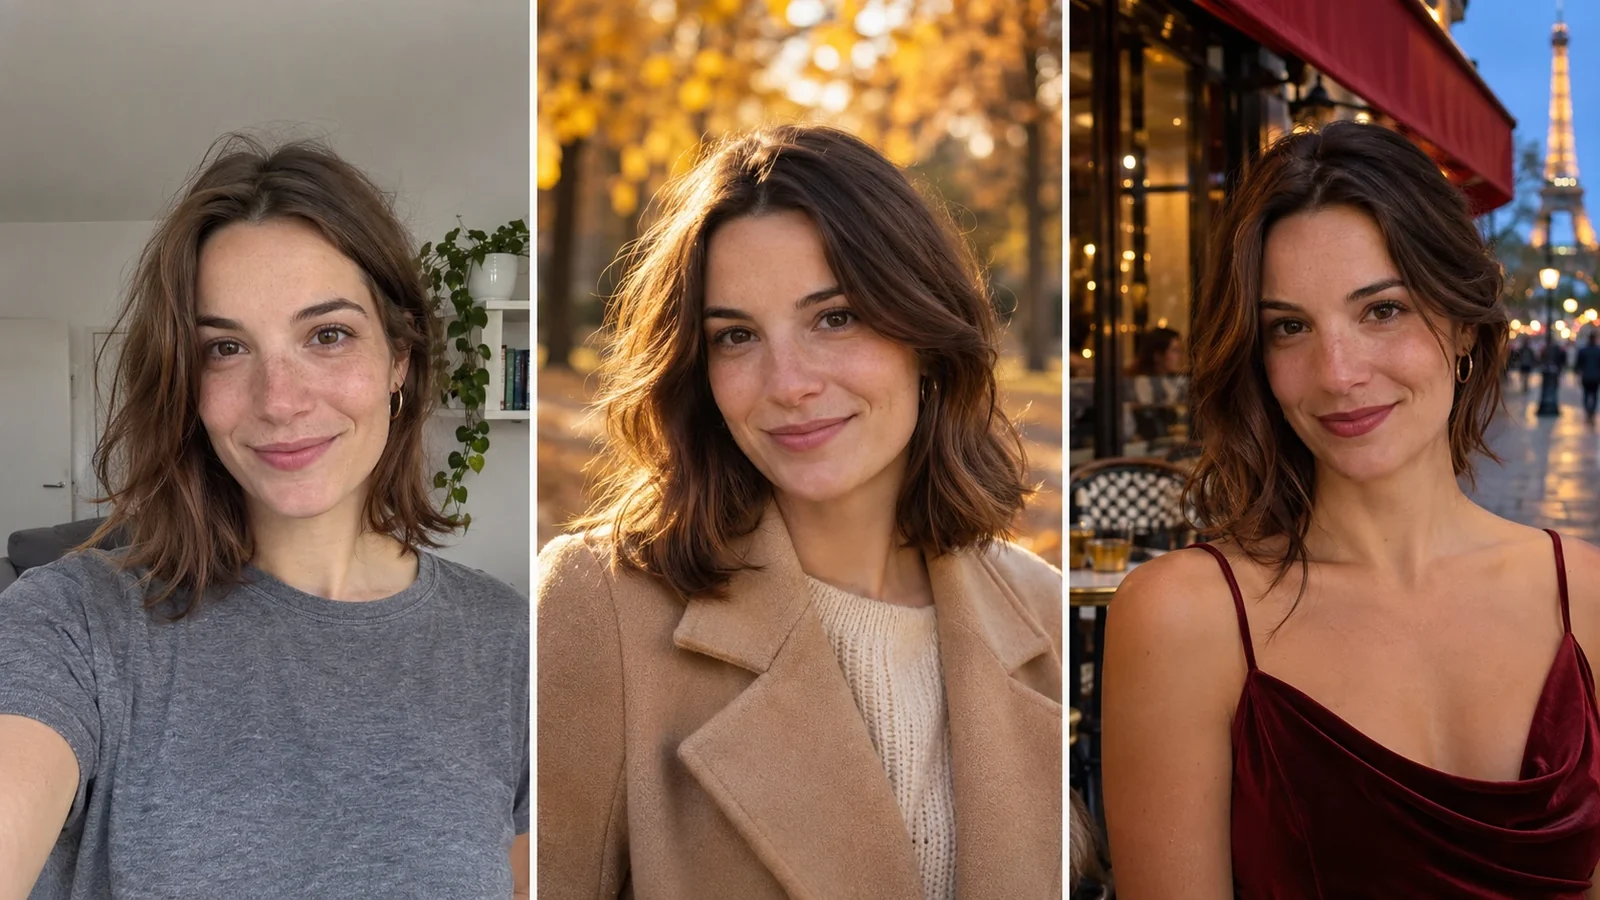
What is an AI photo prompt and how does it work?
An AI photo prompt describes the image you want an AI model to create. You can specify a person's appearance, clothing, background, lighting, camera position, and photography style.
For example, “Create a beautiful photoshoot” leaves too many decisions to the model. It chooses the location, outfit, and camera angle on its own. A more specific prompt, such as “Portrait in a beige coat on a fall street, soft daylight, eye-level camera,” gives you a result closer to what you intended.
For general rules that apply to any AI model, see How to write AI prompts: a step-by-step guide. This lesson focuses specifically on photography.
There are two ways to use photo prompts: generating a new image from text and editing your own photograph.
What's the difference between generating and editing photos?
When generating an image from scratch, the AI creates it from your description. You can specify the character's appearance, the setting, and the composition. You do not need to upload a source photo.
When editing, you upload a photo and describe what you want to change. For example, you can replace casual clothing with an evening gown, move someone into a snowy forest, or remove unwanted objects from the background.
A common approach is to upload your own photo and change the outfit, background, or style.
For these tasks, you need to specify which details from the source image must stay the same. Otherwise, the AI may change the person's face, age, or body proportions.
How to write an AI photo prompt
A good prompt tells the AI what to use from the source photo, which changes to make, and what the finished result should look like.
The elements of a good photo prompt
A photo editing prompt consists of several parts, each serving a different purpose. Here is a complete prompt broken down into color-coded sections:
Use the uploaded photo as the reference.Preserve the person's face, age, hairstyle, eye shape, nose, and lips.Change the outfit to a dark business suit.Place the person in a modern office with a blurred background.Chest-up portrait, eye-level camera.Soft daylight from a window.85mm lens, f/1.8.Realistic photograph, 3:4 aspect ratio.
- Source imagewhere to get the person from
- Preservationwhat to keep unchanged
- Changeswhat to modify
- Settingwhere the person is
- Framingframing and camera angle
- Lightinghow the scene is lit
- Lensportrait perspective and background blur
- Formatstyle and proportions
You can combine all these parts into a single paragraph. Their order does not matter.
Lighting instructions also affect the image. “Soft light from a window on the left” gives the model a more specific task than “beautiful lighting.”
How to write a prompt for generating a photo from scratch
If you do not upload a photograph, the AI needs to create the person, their pose, and the surroundings. There is no original face to preserve. Instead, describe the subject in detail.
Use this structure:
- Subject: who or what appears in the image.
- Appearance: age, hairstyle, clothing, distinctive features.
- Action: what the person is doing, where they are looking, and how their hands are positioned.
- Setting: location and objects in front of and behind the person.
- Composition: framing, subject placement, and empty space.
- Lighting and style: light source, colors, and realism.
- Aspect ratio: 3:4, 1:1, 16:9, or another available option.
Create a beautiful woman in a coffee shop, realistic photograph.
Create a photorealistic portrait of a fictional 28-year-old woman with shoulder-length brown hair. She is sitting by a coffee shop window, holding a cup with both hands and looking at the camera. She is wearing a beige sweater. Waist-up portrait, eye-level camera, soft daylight from the left. Slightly blurred background, natural skin texture, 3:4 aspect ratio.
The second prompt specifies the action, hand positions, lighting, and framing. This leaves less room for the model to make its own decisions about the scene.
When generating an image from scratch, start with the subject and composition. Add lens settings and color styling after you have the objects positioned the way you want.
Technical settings: lens, aperture, lighting, and camera angle
A lens's focal length determines its angle of view: the smaller the number in millimeters, the more of the scene fits into the photograph. Perspective, including the relative sizes of the nose, ears, and background, depends on the distance between the camera and the person. With a longer lens, the photographer stands farther away, so the face looks more natural and the background appears closer and larger. Aperture affects depth of field: at f/1.8, the background is usually more blurred, while at f/8, more objects remain sharp.
In prompts, these settings help define the visual character of a photograph. The AI interprets them as descriptions of the desired image, not as precise settings on a physical camera.
Lens: which focal length should you choose?
The same person photographed with different lenses. The head stays approximately the same size in each frame, while the background and facial proportions change:
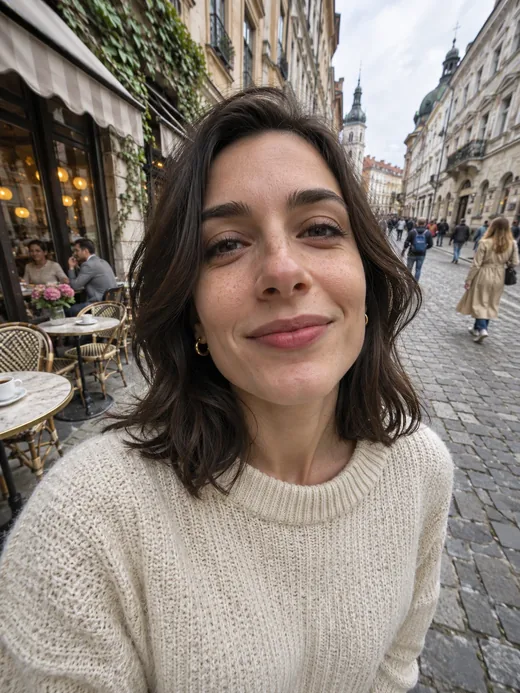 24mm
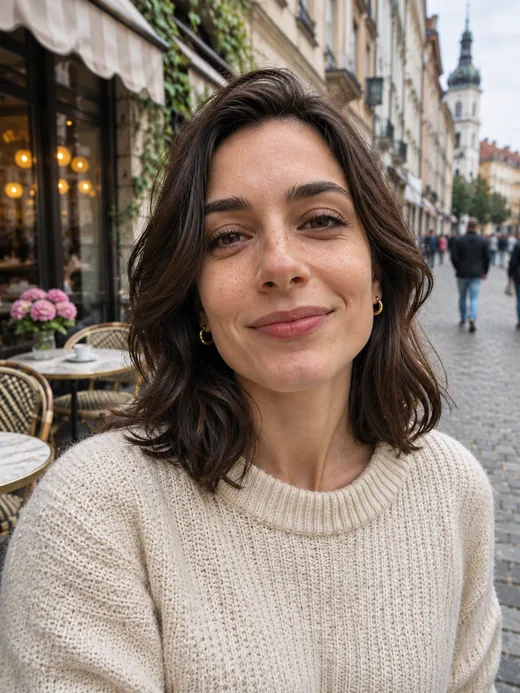 50mm
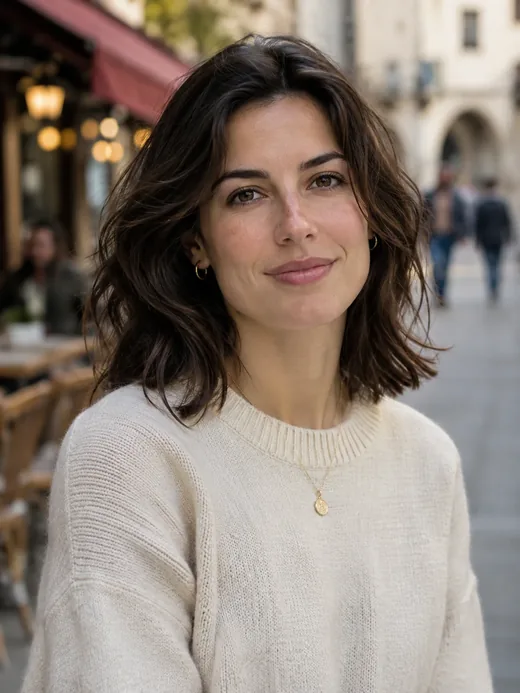 85mm
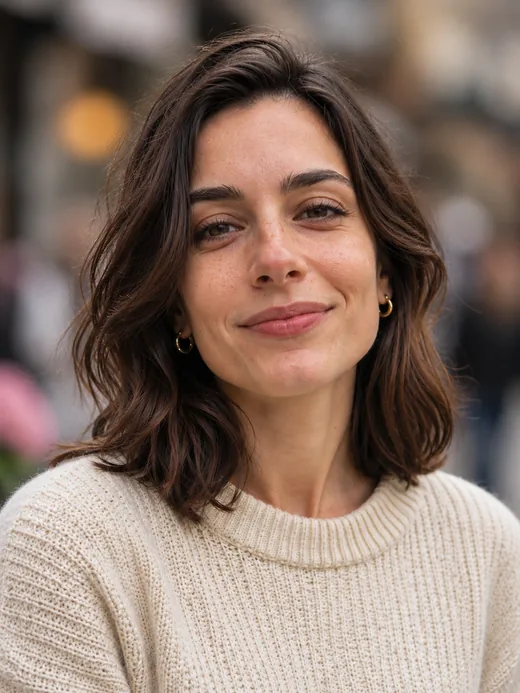 135mm
24mm: wide shots that include the surroundings
Best for landscapes, architecture, interiors, and photos where you want to show a person within a larger setting. For example, a travel photo in a city square or a photograph of a room.
A wide angle emphasizes the distance between nearby and distant objects. Objects close to the camera appear larger.
Avoid 24mm for close-up portraits: the nose may appear larger and the edges of the face may look stretched, especially when the camera is close to the subject.
Prompt snippet: 24mm wide-angle lens, wide shot, person surrounded by their environment, camera at chest height.
35mm: the person and their surroundings
Best for street photoshoots, cafés, walks, and documentary-style shots. The person occupies a noticeable part of the image, but the surroundings also contribute to the composition.
Choose 35mm when the location matters to the scene. For example, a woman sitting at a Parisian café table or a couple walking through a fall park.
Avoid framing the face too closely if you want to maintain familiar facial proportions.
Snippet: 35mm lens, medium shot, both the person and the surrounding environment clearly visible.
50mm: a versatile choice
Best for casual portraits, waist-up photographs, full-body shots, and small groups.
At a typical shooting distance, 50mm produces a moderate perspective. It works well when you want to show a person without strongly emphasizing the background or visually compressing the space.
The angle of view may be too narrow for small rooms. For a close-up facial portrait, 85mm is often a better choice.
Snippet: 50mm lens, natural perspective, waist-up framing, eye-level camera.
85mm: close-up portraits with blurred backgrounds
Best for chest-up and head-and-shoulders portraits, professional headshots, studio photography, and images where the face should be the main subject.
To achieve the same close-up framing, an 85mm lens requires the camera to be farther from the person than a wide-angle lens. This helps avoid exaggerating facial features closer to the camera. A wide aperture also produces noticeable background blur.
Avoid 85mm in a small room or for a large family group photo when you need to include plenty of the surroundings.
Snippet: 85mm portrait lens, f/2, focus on the eyes, softly blurred background.
135mm: portraits with strong background separation
Best for close-up outdoor portraits, fashion photoshoots, and photographing people from a distance.
The narrow angle of view helps exclude unwanted objects from the composition. When the person occupies the same amount of space in the frame, the distant background appears relatively larger and the perspective looks more compressed.
This lens is impractical for group photos in small rooms. In AI prompts, it may produce an overly tight composition.
Snippet: 135mm telephoto lens, close-up portrait, compressed perspective, strong blur in the distant background.
Aperture and background blur
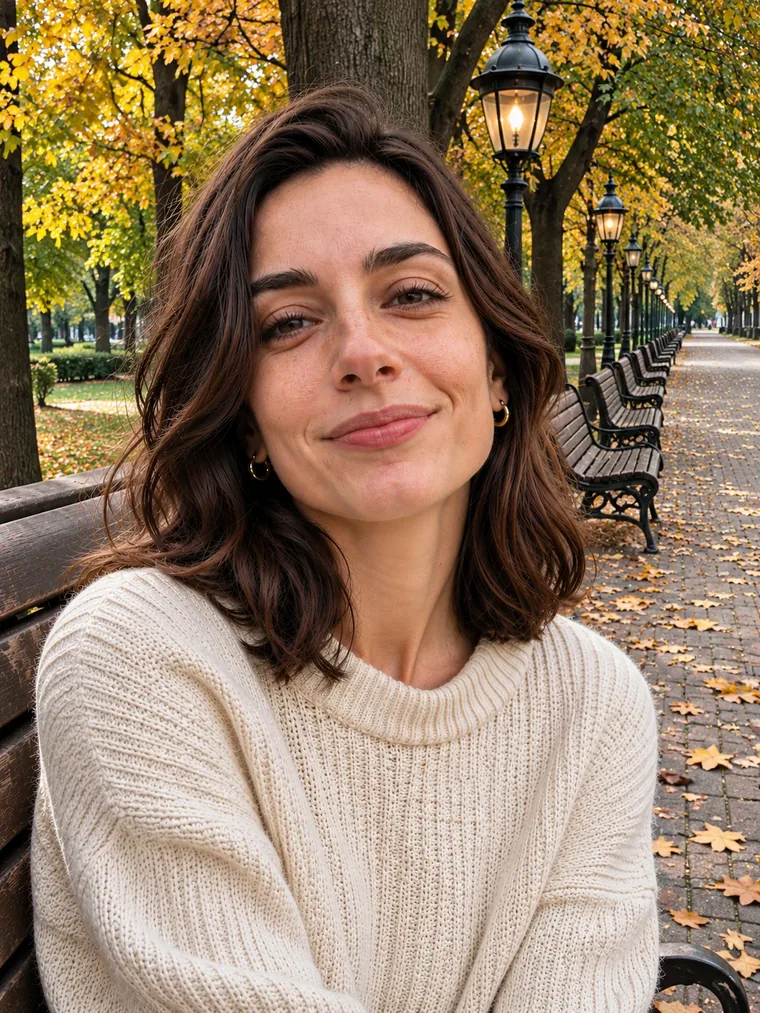
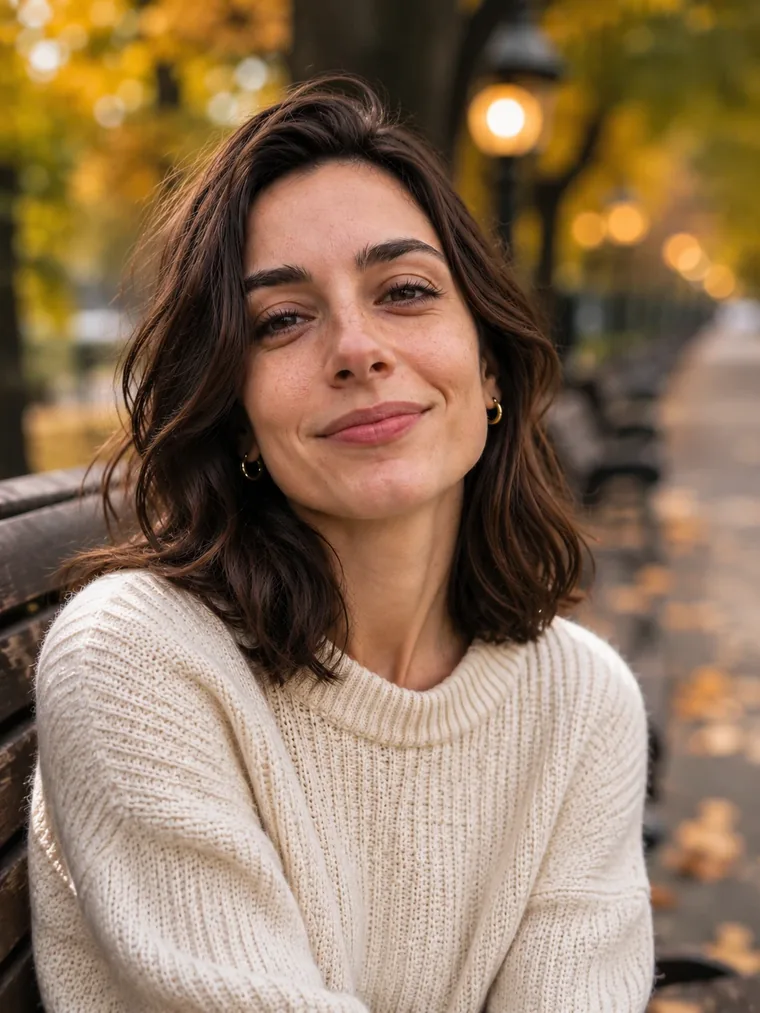 beforeafter
Aperture is expressed as an f-number. A smaller number means a wider lens opening. All else being equal, this reduces the depth of field.
f/1.4–f/2: for one person
Use these settings when you want to emphasize the face and blur the surroundings. They work well for studio portraits, café photography, and evening photos with lights in the background.
Snippet: 85mm, f/1.8, sharp focus on the eyes, strongly blurred background.
With a very shallow depth of field, parts of the face may appear softer, especially if the face is turned. This effect can also be undesirable when two people are at different distances from the camera.
f/2.8–f/4: a person and some surroundings
Best for waist-up photoshoots, couples portraits, and images where the background should remain recognizable.
Snippet: 50mm, f/4, both faces in focus, slightly blurred background.
f/5.6–f/11: multiple people and environmental details
Use these settings for family portraits, groups, interiors, product photography, and landscapes behind a person.
Snippet: 50mm, f/8, all faces and surrounding details sharp.
Background blur also depends on focal length, distance to the subject, and the distance between the subject and the background. Specifying f/1.8 alone does not guarantee the same effect across different images.
Lighting: which setup creates which mood?
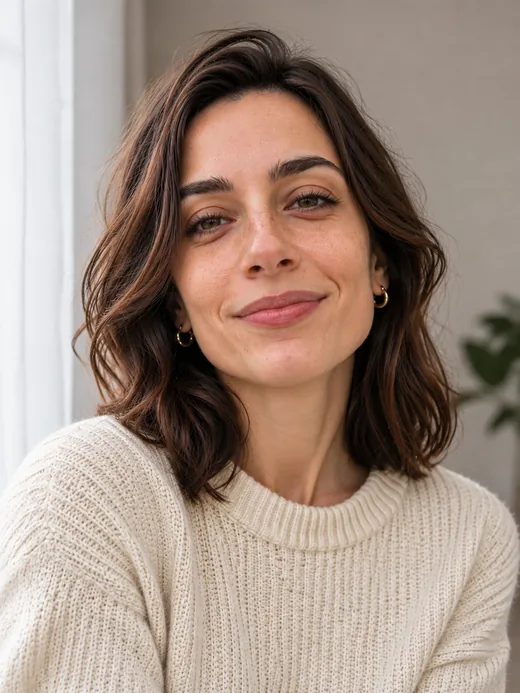 Soft window light
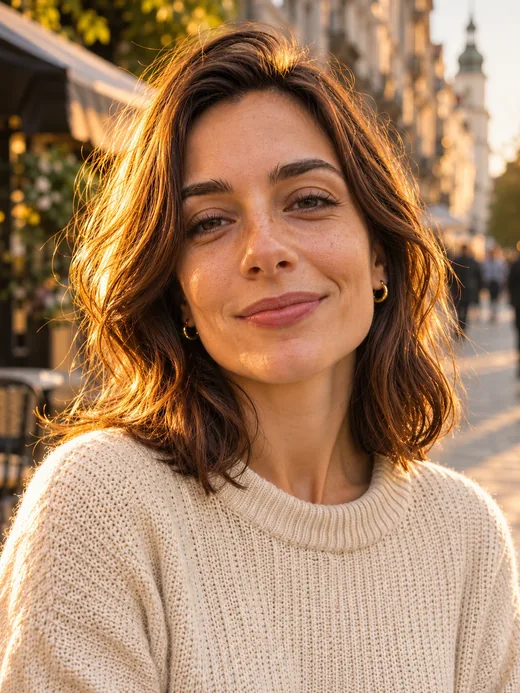 Golden hour
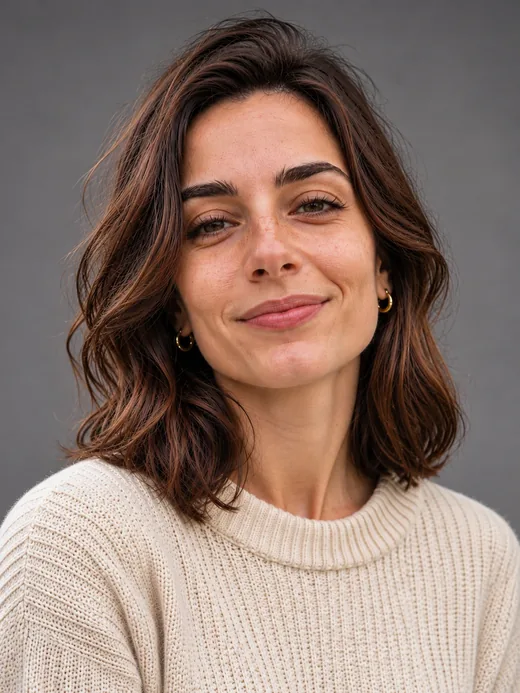 Studio key and fill lighting
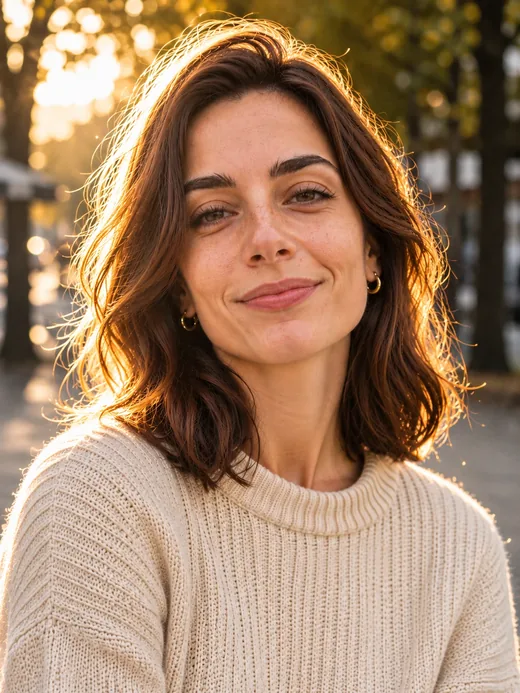 Backlighting
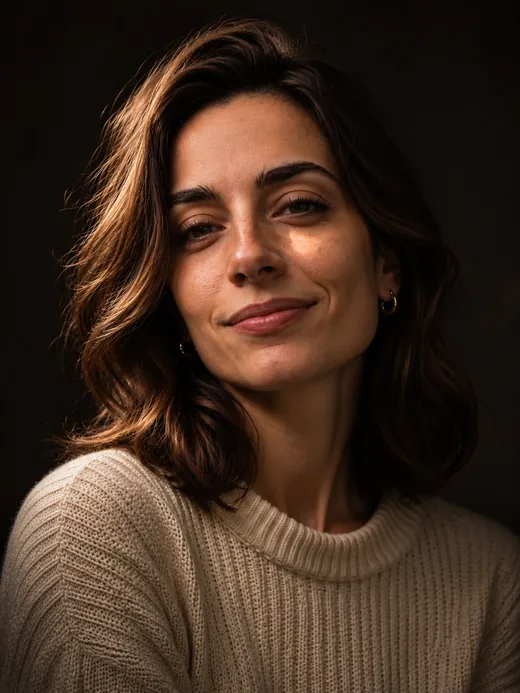 Rembrandt lighting
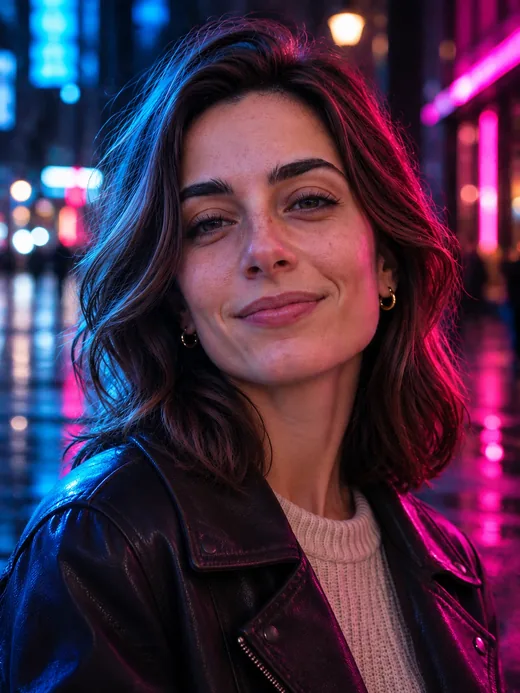 Neon and city lights at night
Lighting determines how visible facial details are, how deep the shadows appear, and the mood of the photograph. In a prompt, specify the light source, its direction, and whether the light is soft or harsh.
Soft window light
Best for portraits at home, children, café photography, and natural-looking professional headshots. It creates gradual transitions between light and shadow while preserving visible skin texture.
Snippet: Large window on the left, soft diffused daylight, natural shadows on the face.
Golden hour
Best for romantic photoshoots, walks, wedding photography, and outdoor portraits.
The low sun produces warm colors and long shadows. For softer lighting on the face, position the sun slightly to the side or behind the person.
Snippet: Golden hour before sunset, warm sunlight from the side, soft long shadows.
Studio key and fill lighting
Best for resume photos, professional portraits, and catalog photography.
The key light creates the main highlights and shadows. The fill light brightens the shadow side. Stronger fill lighting makes the face appear less contrasty.
Snippet: Large soft key light from the left at a 45-degree angle, subtle fill light from the right, neutral background.
Backlighting
Best for sunset portraits, photographs emphasizing hair or clothing, and atmospheric scenes.
A light source behind the person creates a bright outline around the subject. If the face becomes too dark, ask for soft frontal fill light.
Snippet: Warm backlighting behind the person, rim light around the hair, soft frontal fill light on the face.
Rembrandt lighting
Best for dramatic portraits of men, black-and-white photography, and cinematic shots.
The main light source is positioned above and to the side of the face. A small illuminated triangle appears on the shadowed cheek, creating pronounced depth and contrast.
Snippet: Rembrandt lighting, key light positioned above and to the side, triangle of light on the shadowed cheek.
Harsh midday sunlight
Best for summer city scenes, beaches, and images with sharp geometric shadows.
The high sun creates strong contrast and shadows beneath the eyes and nose. This lighting is often unflattering for conventional portraits but works well for intentionally harsh fashion photography.
Snippet: Bright midday sun, sharp shadows, high contrast, realistic street photography.
Neon and city lights at night
Best for nighttime portraits, urban photoshoots, and cinematic scenes.
Colorful signs illuminate the face from different directions. To keep the person recognizable, explicitly instruct the model to preserve their natural facial features.
Snippet: City street at night, blue neon light from the left, warm storefront lighting from the right, face clearly visible.
Camera angle and height
Eye level. A neutral camera angle for resume photos, family portraits, and everyday portraits. The face looks familiar, without intentionally exaggerated perspective.
Snippet: Camera at eye level, person looking directly into the lens.
Low angle. The camera points slightly upward. This can make the person appear more imposing, emphasize their height, or draw attention to the architecture behind them. An excessively low camera position may distort proportions.
Snippet: Camera slightly below chest height, moderate low-angle shot.
High angle. The camera points downward. This works for photos of people sitting at tables, pet photography, and casual portraits. A steep downward angle can make the head look disproportionately large.
Snippet: Camera slightly above eye level, gentle downward angle.
Over-the-shoulder. The camera is positioned behind one person, with another subject or object visible ahead. This works for conversations, scenes of someone working at a computer, or shared activities.
Snippet: Over-the-shoulder shot, slightly blurred foreground, main subject in focus.
Film and color grading
Naming a film stock in your prompt helps define the image's colors and texture. The AI imitates its visual characteristics, so the result may differ from a photograph actually shot on film.
Kodak Portra 400. Use it for family photos, fall photoshoots, and daylight portraits. Typical visual characteristics include moderate saturation, soft contrast, natural skin tones, and fine film grain.
Snippet: Kodak Portra 400 aesthetic, soft contrast, natural skin tones, subtle film grain.
Black-and-white film. Best for expressive portraits, vintage photography, and images where color would distract from facial expressions. Specify contrast and grain separately.
Snippet: Black-and-white film photography, moderate grain, deep shadows, preserved skin details.
Cinematic color grading. Best for nighttime city scenes, dramatic portraits, and environments with mixed color temperatures. Rather than simply writing “cinematic,” specify the colors you want.
Snippet: Warm skin tones, cool teal-blue shadows, moderate contrast, no excessive saturation.
Do not add film grain to a prompt for restoring an old photograph or improving sharpness if your goal is to remove defects.
Quick reference: ready-to-use settings for different tasks
| Task | Lens | Aperture | Lighting | Camera angle |
|---|---|---|---|---|
| Resume headshot | 85mm | f/4 | Soft frontal light, minimal shadows | Eye level |
| Professional portrait | 85mm | f/2.8 | Side window light, soft fill | Eye level |
| Outdoor photoshoot | 50mm | f/2.8 | Golden hour | Chest height |
| Romantic couples photo | 50mm | f/4 | Warm evening light | Eye level |
| Family photo | 50mm | f/8 | Soft, even lighting | Eye level |
| Child portrait | 85mm | f/2.8 | Diffused window light | Child's eye level |
| Christmas tree portrait | 50mm | f/2 | String lights and soft frontal light | Eye level |
| Product photo for an online marketplace | 85mm | f/8–f/11 | Two large soft light sources | Product level |
These are starting points for prompts, not universal rules. For a family photo with people standing in multiple rows, also specify that every face must be sharp. For product photography, instruct the model to preserve the product's shape, proportions, color, and visible details.
Use the uploaded photo of the woman. Preserve her face and age. Change her outfit to a beige sweater. Create a studio portrait with a blurred background.
Use the uploaded photo of the woman. Preserve her face, age, and proportions. Change her outfit to a beige sweater. Chest-up studio portrait, visual characteristics of an 85mm lens, f/2, focus on the eyes. Key light from the left at a 45-degree angle, soft fill light from the right. Preserve the original facial perspective. 3:4 aspect ratio.
For your first generation, choose a lens, depth of field, and lighting setup from the table that matches your task. If the result differs from what you intended, change one setting at a time: start with lighting, then adjust background blur or camera angle. This makes it easier to identify which instruction affected the image.
Composition, pose, and details in the shot
Technical settings shape the look of a photo. The rest depends on where the person is positioned, their pose, material textures, and the image format.
Composition: how to position a person in the frame
Even with good lighting, a photo can look awkward if the person is too small, too close to the edge, or competing with a distracting background.
You can use a prompt to control where subjects appear and how much of the frame they occupy.
Rule of thirds
Imagine dividing the image into nine sections using two horizontal and two vertical lines. You can position the person near one of the vertical lines and the horizon near a horizontal line.
This works well for outdoor portraits, nature photos, and shots that include the surroundings. A centered composition is often better for a professional headshot or a symmetrical studio portrait.
Prompt snippet: Position the person along the right third of the frame, with an autumn park visible on the left. Camera at eye level.
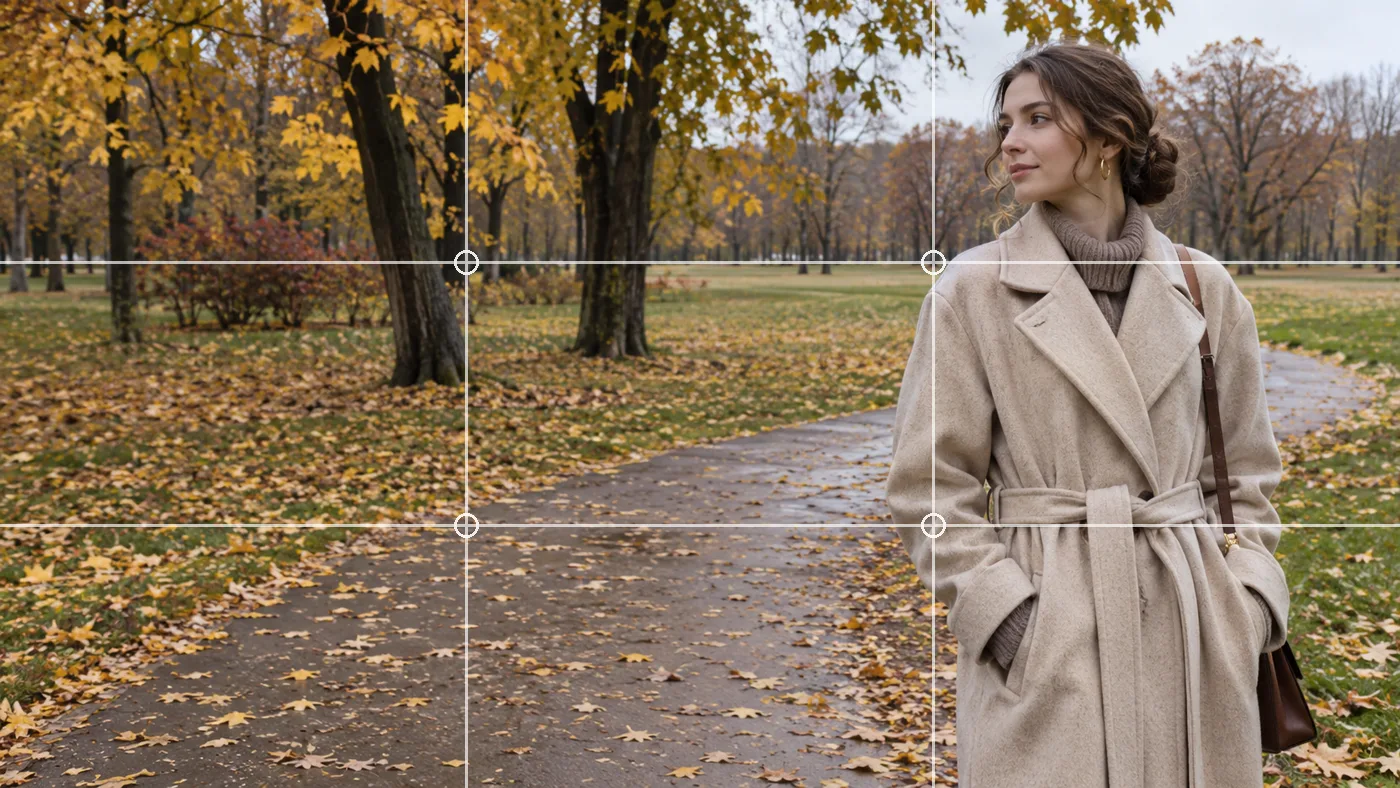
Leading lines
A road, staircase, fence, or row of trees can guide the viewer's eye toward the person.
Prompt snippet: A woman standing at the end of a park path, with the lines of the path leading the viewer's eye toward her. Horizontal composition.
Use this technique when the surroundings should help draw attention to the main subject.
Negative space
If a person is looking to the right, you can leave more room on that side. This creates space in the direction of their gaze.
Empty space is also useful for adding text to a greeting card or cover image.
Prompt snippet: Portrait of a woman positioned in the left third of the frame, looking to the right. Leave an empty, solid-color background on the right.
Foreground, middle ground, and background
Placing objects at different distances helps create depth in a scene.
Prompt snippet: Slightly blurred autumn leaves in the foreground, a woman wearing a coat in the center, and a tree-lined path in the background.
Foreground elements should not obscure the face or other important details.
Shot size and framing
Specify how much of the person should be visible:
- Close-up: face and shoulders.
- Medium shot: from the waist up.
- Knee-length shot: from the knees up.
- Full-body shot: the entire person, including shoes.
- Wide shot: the person and much of the surrounding environment.
For a full-body shot, add Show the entire person from head to toe, including their shoes, with enough empty space around them.
Pose, gaze, and hands: how to control the person in the frame
An AI model might generate the right outfit and background but choose an unnatural pose. To prevent this, describe the position of the body, head, and hands, along with the direction of the person's gaze.
A few specific instructions are enough for a portrait.
- Body position: standing upright, sitting sideways, leaning against a table.
- Head and gaze: looking at the camera, head turned to the right, looking at another person.
- Hands: holding a cup, resting on the knees, one hand in a pocket.
- Facial expression: calm, slight smile, thoughtful.
Avoid asking for “a beautiful, natural pose” when you need a specific body position.
A man sitting in a café, looking confident and natural.
A man sitting at a table by a window, his torso turned slightly to the left. His right hand rests on the table beside a cup, and his left hand rests on his knee. His head is turned toward the camera, with a calm facial expression. Waist-up portrait, with both hands positioned naturally.
How to avoid mistakes with hands
If the hands are clearly visible, describe a specific action and the object they are interacting with.
For example: His right hand holds a cup by its handle, while his left hand rests on the table, with fingers naturally curved.
For complex gestures, check the number of fingers, joint positions, and how the hand makes contact with objects. Prompt wording reduces ambiguity but does not guarantee correct anatomy.
When editing your own photo, if the existing pose works, use this instruction: Preserve the original pose, hand positions, gaze direction, and facial expression.
This reduces the risk of unwanted changes to the person's body.
Realistic skin, clothing, and textures
To create a believable image, describe the visible properties of materials. Asking for “maximum realism” is not enough if the model produces overly smooth skin or clothing without natural folds.
Skin without excessive retouching
For portraits, you can use:
Natural skin texture with visible fine pores, soft transitions between light and shadow, no excessive smoothing or changes to facial features.
Do not request both “perfectly smooth skin” and “natural skin texture.” These instructions conflict.
Clothing and materials
Specify the fabric, cut, color, and how the clothing fits.
Instead of “a beautiful, expensive-looking suit,” write:
A navy blue wool blazer with visible fabric texture, natural folds around the sleeves, and a white cotton shirt.
For product photography, describe the item's surface. For example: A matte ceramic cup with soft reflections, without a glossy plastic appearance.
How to check realism
After generation, zoom in on the image. Check the skin around the eyes, hairline, clothing edges, fingers, and points where objects touch the hands.
If a surface looks plastic, remove phrases such as “flawless skin” and “perfect retouching” from the prompt. Add descriptions of natural textures and suitable lighting instead.
How to choose an image format
The aspect ratio determines the shape of the frame. It does not determine the pixel count or image quality.
| Aspect ratio | Best for | What to include in the prompt |
|---|---|---|
| 1:1 | Profile pictures, square social media posts | “Square portrait, face centered” |
| 3:4 | Portraits, photoshoots | “Vertical waist-up portrait” |
| 9:16 | Vertical stories and video covers | “Person centered, with space above and below” |
| 16:9 | Cover images, horizontal scenes | “Wide composition, with surroundings visible on both sides” |
For a square profile picture, avoid placing the face too close to the edge. Part of the image will be cropped when displayed as a circle.
For a cover image that will include text, leave some negative space. For example: Person positioned in the right third of the frame, with a plain background on the left for a headline.
If the editor lets you select the aspect ratio separately, set it in the generation settings. The prompt then helps define the composition within your chosen format.
How to preserve facial features and appearance
When editing your own photo, include an instruction to preserve facial features. Saying “the same person” is sometimes not enough.
You can use this prompt snippet:
Preserve the identity and recognizable appearance of the person in the source photo, including their face shape, eyes, nose, lips, age, and natural proportions. Do not alter their appearance to match the selected style.
If the AI still changes the face, reduce the number of transformations. Start by changing only the background or clothing. Then add lighting and other details.
The quality of the source image also affects the result. If the face occupies only a small part of the frame, is turned to the side, or is obscured by hair, the AI will have a harder time preserving its features.
How to use a reference image
A reference image shows the AI the appearance, clothing, pose, or style you want.
Not all reference images serve the same purpose. First, decide which details the AI should take from each image.
How to choose a source photo of a person
To preserve someone's face, choose a photo where their facial features are clearly visible. A photo with even lighting and no heavy blur works best.
If recognizable facial features matter, avoid source images with closed eyes, strong filters, or a subject positioned far from the camera.
For clothing changes, a photo showing the relevant part of the body is more useful. If the original shows only the face, the AI will have to generate the rest of the body.
How to combine multiple reference images
In modes that support multiple images, assign a separate role to each source.
For example:
Image 1 shows the person whose appearance must be preserved. Image 2 is a clothing reference. Use the face, age, and hairstyle only from Image 1. Take the clothing style and color from Image 2. Create a waist-up portrait against a light studio background.
If you use separate photos of two people, specify where each person should appear:
Image 1 shows a man, and Image 2 shows a woman. Preserve each person's facial features based on their respective source image. Position the man on the left and the woman on the right, both looking at the camera. Create a studio portrait of them together.
The ability to upload multiple source images depends on the selected model and editor mode.
How to create couple and family photos without mixing up faces
When generating a group photo, the AI needs to preserve the number of people, their appearances, and their positions. The more people and details involved, the harder the task becomes.
Describe each person separately and specify where they should appear in the frame.
For example:
Use the uploaded family photo. Preserve the faces, ages, and hairstyles of all three people. The man stands on the left, the woman on the right, and the child between them. Keep the original number of people and do not add anyone. Everyone looks at the camera, with their hands positioned naturally. Soft studio lighting, all faces in focus, 16:9 aspect ratio.
If you use separate photos of each person, specify which source image corresponds to each position in the finished image.
After generation, check the number of people, faces, hands, and relative heights. If something is wrong, clarify where each person should be positioned. If the model repeatedly mixes up people's appearances, simplify the background and poses.
Do you need to write AI photo prompts in English?
No. GPT Image 2.5, Nano Banana 2.1, and other models available in Neuromia accept prompts in multiple languages, including English.
Start with a description in the language you're most comfortable using. If a particular effect does not come out correctly, clarify the subject, composition, or lighting. Translating an entire prompt into English does not guarantee better results.
How to specify what should not appear in a photo
Negative instructions help define constraints, but an AI model may not follow them consistently.
Instead of writing a long list such as “no mistakes, no extra arms, no bad anatomy,” start by describing the result you want.
Weak wording:
No ugly hands, no awkward poses, no bad lighting.
More specific wording:
The person sits upright, with both hands resting on the table, fingers naturally curved, and even lighting across the face.
Reserve negative instructions for specific restrictions: No text, logos, or watermarks.
If the model adds an unwanted object, clarify exactly what the scene should contain. For example: Only one cup and a closed book on the table.
Long lists of restrictions do not guarantee that every unwanted detail will disappear.
How to add text to a photo
For a greeting card, cover image, or advertisement, specify the exact wording, placement, and appearance of the text.
For example:
Create a festive birthday card. At the top, add the exact text “Happy Birthday, Anna!” in a large white sans-serif font. Use a dark navy blue background behind the text so the entire message is clearly readable.
After generation, check every letter, punctuation mark, and whether the text remains readable when the image is reduced in size.
If the wording must match the original exactly, the more reliable approach is to generate an image with empty space first, then add the text in an image editor.
For a regular portrait, include No text or logos if you do not want them to appear.
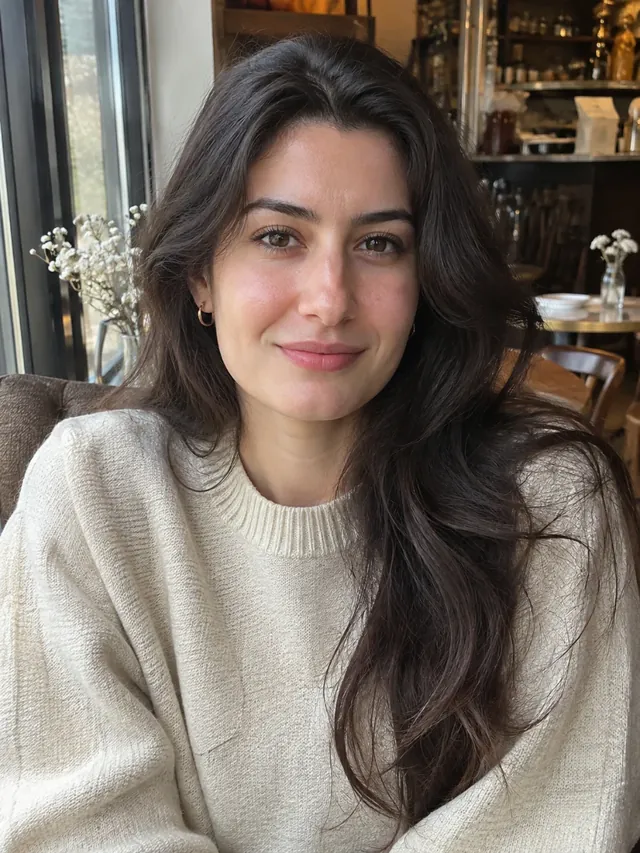
Create a portrait using your own photo
Use the uploaded photo of the person as the reference. Preserve their face, age, eye shape, nose, lips, and natural proportions. Change their outfit to a light-colored casual sweater. Create a chest-up portrait in a cozy café. Soft daylight from a window, realistic photography, vertical 3:4 aspect ratio. 85mm portrait lens, f/2, focus on the eyes.
Create a portrait without a source photo
Create a realistic photograph of a fictional 30-year-old woman with short brown hair. She is sitting at a wooden table in a café, with her left hand resting next to a cup and her right hand holding an open book. She is looking out the window. 50mm lens, f/2.8, soft light from the left. Waist-up portrait, 3:4 aspect ratio, natural skin texture.
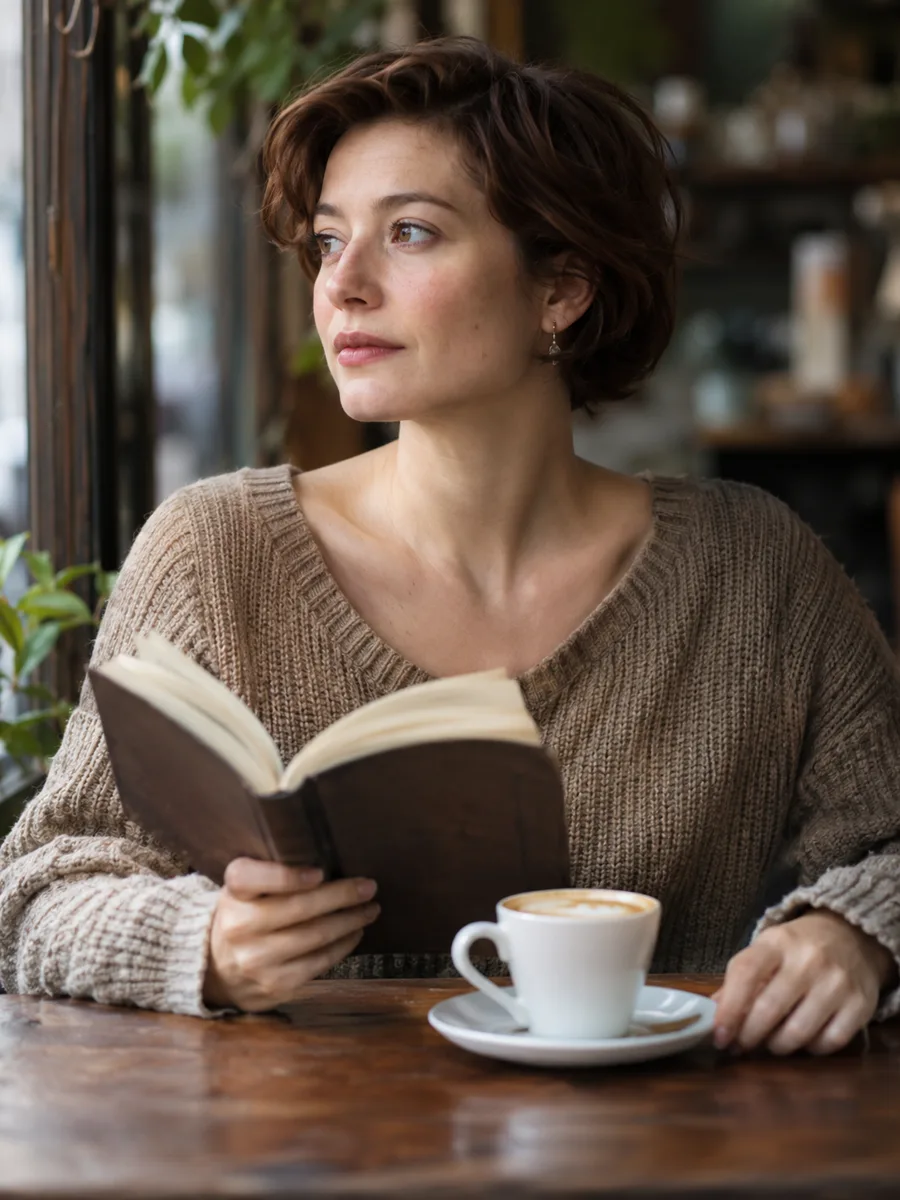
After generation, check the hand positions, gaze direction, and placement of objects. If one detail is incorrect, refine the corresponding part of the prompt.
Ready-to-use AI photo prompts for different themes
Below you'll find prompts for photoshoots, portraits, family pictures, and photo editing. Each example indicates whether you need to upload a photo.
In the cards, you can preview the image, copy the prompt, or open it in the Neuromia editor.
A vertical 3:4 aspect ratio usually works best for portraits. A square 1:1 format is useful for profile pictures, while 16:9 works well for horizontal compositions that include the surroundings. These are framing recommendations, not model limitations.
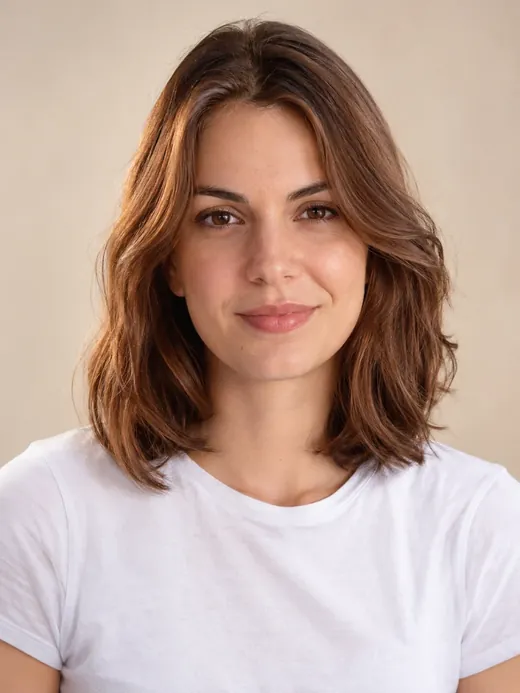 Studio portraitwith your photo
Use the uploaded photo of the woman as the reference. Preserve her face, age, hairstyle, and natural proportions. Change her outfit to a plain white shirt. Place her in front of a light beige studio backdrop. Soft light from the left, chest-up portrait, eye-level camera. Realistic skin texture, 3:4 aspect ratio. 85mm lens, f/2, focus on the eyes, soft fill light from the right.
Try itabout 4 cr.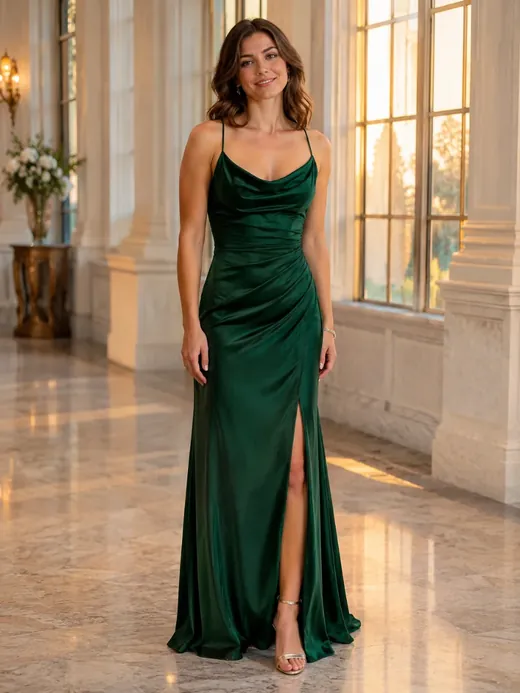 Woman in an evening gownwith your photo
Preserve the woman's face, age, hair color, and distinctive features from the uploaded photo. Change her outfit to a long emerald-green evening gown. Place her in a hall with tall windows and light-colored walls. Warm evening light, full-body photograph, natural pose. Realistic style, 3:4 aspect ratio. 50mm lens, f/2.8, camera at chest height.
Try itabout 7 cr.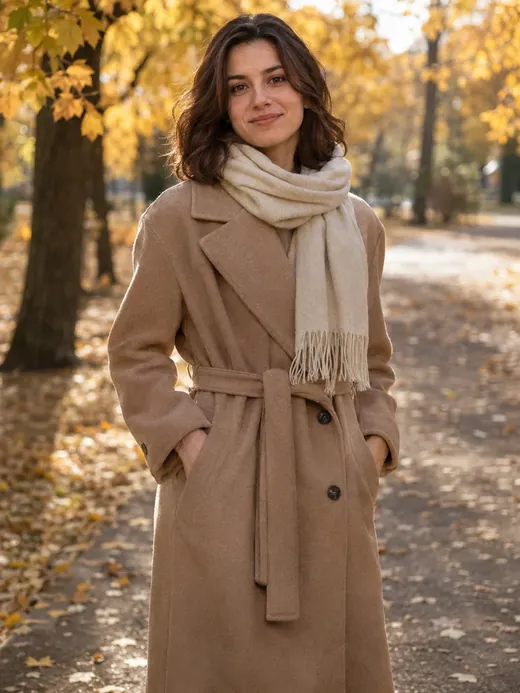 Fall photoshootwith your photo
Use the uploaded photo of the woman. Preserve her face, age, body proportions, and hairstyle. Dress her in a long beige coat and a light-colored scarf. Place her in a fall park with yellow leaves in the background. Soft sunlight, slightly blurred background, knee-up framing. Realistic photograph, 3:4 aspect ratio. 50mm lens, f/2.8, camera at chest height.
Try itabout 4 cr.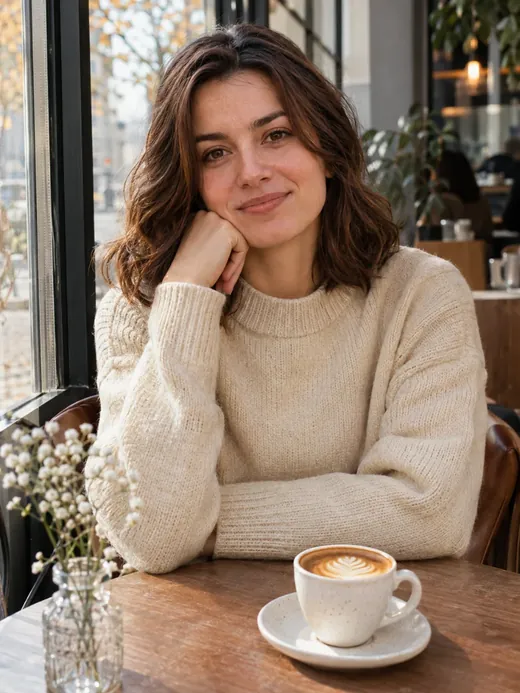 Portrait in a coffee shopwith your photo
Preserve the woman's face, age, eye shape, nose, and lips from the uploaded photo. Seat her at a small table by the window of a coffee shop. Outfit: plain cream-colored sweater. A cup of coffee sits on the table. Natural daylight, relaxed facial expression, camera slightly above table height. Photograph, 3:4 aspect ratio. 50mm lens, f/2, softly blurred background.
Try itabout 4 cr.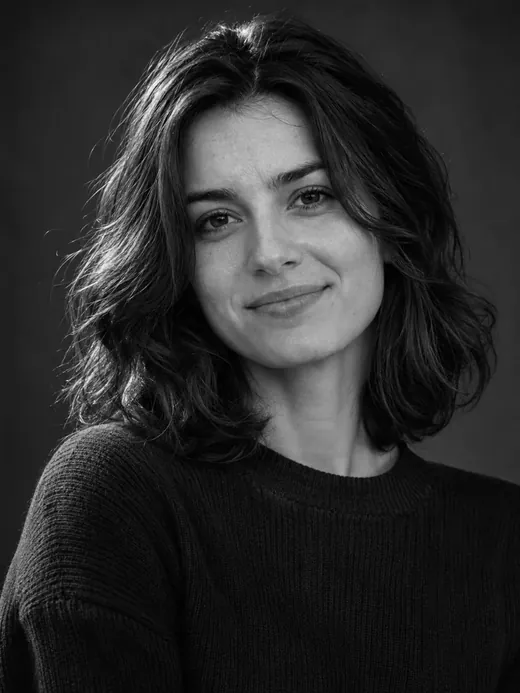 Black-and-white portraitwith your photo
Use the uploaded photo of the woman as the reference. Preserve her face, age, expression in her eyes, hairstyle, and proportions. Transform the image into a black-and-white studio portrait with natural contrast. Dark neutral background, soft side lighting, head-and-shoulders framing. Preserve natural skin texture without excessive retouching. 3:4 aspect ratio. Studio key light at a 45-degree angle, subtle fill light, darkened background.
Try itabout 7 cr.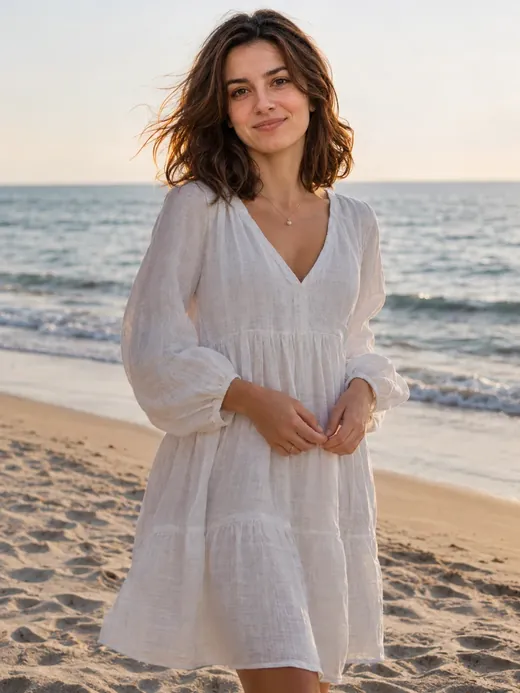 Summer beach photoshootwith your photo
Preserve the woman's face, age, hairstyle, and natural body shape from the uploaded photo. Change her outfit to a loose white linen dress. Place her on a sandy beach beside a calm sea. Early morning, soft sunlight, gentle breeze moving her hair. Knee-up framing, realistic photograph, 3:4 aspect ratio. 50mm lens, f/4, natural depth of field.
Try itabout 4 cr.
Tips for each catalog category
AI photo prompts for women
These prompts let you change clothing, lighting, and location. For example, you can create a studio portrait, a photo in an evening gown, or a shot on an autumn street.
All examples use an uploaded photo. The prompts include instructions to preserve facial features, age, and proportions.
AI photo prompts for men and portraits
This collection includes professional headshots, casual photoshoots, and portraits with cinematic lighting.
For a close-up portrait, specify the camera angle and direction of the light. Without these details, the AI may change the composition on its own.
AI photo prompts for couples
To create a photo of two people together, you can upload an image that already includes both people. If you have separate source photos, specify which person to use from each image.
Ask the model to preserve each person's appearance separately. When combining different photos, the model may mix up faces or alter proportions.
AI photo prompts for families and children
This collection includes family portraits, photos of children, parents with their children, and at-home photoshoots.
When editing children's photos, it is better to limit changes to clothing, background, and lighting. Specify that the child's age and natural facial features must be preserved.
Only upload children's photos with appropriate permission. Do not publish personal photos without the consent of the people depicted.
Christmas and holiday photo prompts
You can turn an ordinary portrait into a festive holiday photo. The AI can add a Christmas tree, holiday lights, winter clothing, or a snowy background.
To keep the person recognizable, specify that their face must be preserved and only the surroundings, clothing, and lighting should change.
Birthday photo prompts
These examples work for birthday photoshoots and greeting cards made from photos.
If the image needs to include a name or age, check the text after generation. The model may make mistakes with letters or numbers. For exact wording, using a separate image editor is more reliable.
AI photo prompts in different styles
You can use a prompt to give a photo a Soviet-era look, a 1990s aesthetic, an anime style, or a cinematic portrait treatment.
For stylization, it helps to specify exactly what should change: clothing, color palette, image texture, or background.
Photo editing and enhancement prompts
This category includes old photo restoration, sharpening, background removal, and lighting correction.
If your goal is photo enhancement, do not ask the model to redraw the face. Otherwise, the result may look sharper than the original but lose the person's likeness.
When restoring damaged photographs, AI may invent missing details. Compare reconstructed faces and objects against the original.
Professional headshot and resume photo prompts
AI can replace the background, adjust lighting, and create a clean professional portrait.
For a resume, choose a realistic style without significantly changing your appearance. The photo should still look like the person who will attend the interview.
AI photo prompts from scratch
These examples do not require an uploaded image. The AI generates the person and surroundings from scratch.
Your prompt should describe the person's age, clothing, position in the frame, surroundings, and lighting. The more specific the instructions, the fewer details the model has to invent.
Which AI model should you use for photos?
Neuromia offers several models for generating and editing photos. They differ in how well they preserve facial features in uploaded photos, how accurately they follow long instructions, and how much each generation costs.
| Model | Best for | Price per image |
|---|---|---|
| Nano Banana 2.1 | Editing your own photos: changing clothing, backgrounds, and styles while preserving facial features | 4.4 credits |
| GPT Image 2.5 | Complex scenes with detailed prompts, stylization, and text in images | 6.6 credits |
| Seedream 5 Pro | Detailed photorealistic shots and high-resolution images | 7.7 credits |
| Flux 3 Klein | Fast, inexpensive experiments and image generation from scratch | 1.8 credits |
More about each model
Nano Banana 2.1
Google's model for editing uploaded photos. It generally preserves a person's appearance well when changing clothing, backgrounds, and lighting. It works for most prompts in the catalog that involve changing an outfit, background, or lighting. A good choice for your first attempt.
GPT Image 2.5
OpenAI's model for image generation and editing. It follows long, detailed instructions well and handles complex compositions, stylization, and short text in images. It can be more restrictive when editing photos of real people and may refuse some requests, so keep your instructions clear and specific.
Seedream 5 Pro
Produces detailed photorealistic textures and supports high resolution. It is suitable for final images once you have refined your prompt using a less expensive model. It may also refuse requests involving personal photos. If that happens, try Nano Banana.
Flux 3 Klein
The cheapest and fastest option on this list. Useful for testing an idea, composition, or lighting before generating the final image with a more expensive model.
Why your AI photo prompt isn't working and how to fix it
If generation ends with an error, the cause is usually a model refusal or moderation rejection rather than a technical failure. These problems require a different approach from fixing an image that simply looks wrong.
A generation error and an unsatisfactory result require different actions. If the AI creates a photo but changes the face, refine your instructions. If the request is rejected, check the reason for the refusal first.
The AI changed the person's face
A common cause is a prompt that describes a new appearance in detail but never tells the model to preserve the original face.
Create a beautiful woman in a red dress with Paris in the background.
Use the uploaded photo of the woman. Preserve her face, age, eye shape, nose, lips, and hairstyle. Change her outfit to a red evening gown. Add a Parisian street in the background. Soft evening light, waist-up portrait, realistic photograph, 3:4 aspect ratio.
The revised prompt gives the model a specific task: preserve the person while changing the clothing and surroundings.
If the person still looks different, try a source portrait where the face appears larger and reduce the number of changes.
The model refused to process the request
In Neuromia, you may see messages such as “The model refused to process the request” or “Rejected by moderation: the description or uploaded photos raised concerns.”
A refusal does not necessarily mean your prompt is structured incorrectly. It may be caused by the content of the request, model restrictions, or the source image.
Check whether your prompt asks for prohibited content. If the request is allowed, remove ambiguous wording, clarify the task, and use a suitable source photo.
Do not try to bypass model restrictions by disguising prohibited instructions.
If the problem is a technical failure unrelated to the prompt's content, trying the generation again may help. If the error persists, save the error message for troubleshooting.
The background or clothing doesn't match the prompt
If the model generates the wrong clothing, specify the color, material, and cut.
Instead of “a stylish outfit,” write “a plain beige wool sweater with no pattern.”
If the background is too distracting, add “slightly blurred background, face in sharp focus.” For a studio portrait, specify the background, such as “solid light gray.”
Avoid overloading one prompt with conflicting instructions. “Close-up portrait of the face” and “entire person visible in the frame” describe different compositions.
The result looks unnatural
Possible causes include excessive retouching, poor lighting, or too many stylistic effects.
Try replacing a vague phrase such as “a very beautiful professional photo” with specific parameters: “natural skin texture, soft daylight, no changes to facial proportions.”
Change one parameter at a time when comparing results. This makes it easier to identify which instruction affected the image.
How to improve your results over several attempts
If a photo is almost right, you do not necessarily need to generate the entire scene again. In an editor that supports repeated editing, you can use the previous result as the source image and change individual details.
Work through the image in this order:
- Check the composition: Are the people positioned correctly? Are the required objects visible?
- Check the face and anatomy: eyes, hands, and body proportions.
- Correct the clothing and background without changing the rest of the scene.
- Refine the lighting, colors, and blur.
- Examine the finished image at full size.
For example, the first generation may get the face right but produce a sweater in the wrong color.
Instead of repeating the entire original prompt, use:
In the generated image, change only the sweater color from gray to beige. Keep the face, pose, background, lighting, and composition exactly as they are.
If you only need to change the background:
Replace the background with an autumn park. Do not change the person, clothing, pose, scale, or perspective.
If your selected mode does not support editing a generated result, return to the original photo and revise the initial prompt.
Compare versions using specific criteria: facial resemblance, composition, hands, clothing, and lighting. Change one group of parameters per attempt.
How to check the quality of your finished image
Before saving, inspect the result at full size. Errors in eyes, fingers, hair, and clothing details may not be visible in a small preview.
Use this quick checklist:
- Face: resemblance, symmetry, and age.
- Hands: number of fingers and hand positions.
- Clothing: seams, folds, and unwanted details.
- Background: extra objects and distorted lines.
- Text: correct spelling and readability.
- Framing: no important body parts or objects accidentally cropped.
If the image is too small or blurry, check the resolution settings and available photo enhancement options.
Upscaling increases image size and can improve perceived detail. With generative enhancement, the model may also change small details, including eyes and text.
Compare the enhanced file with the original. If facial accuracy or exact lettering matters, do not treat AI-generated details as an accurate reconstruction of the source.
Fix a prompt that changes the face
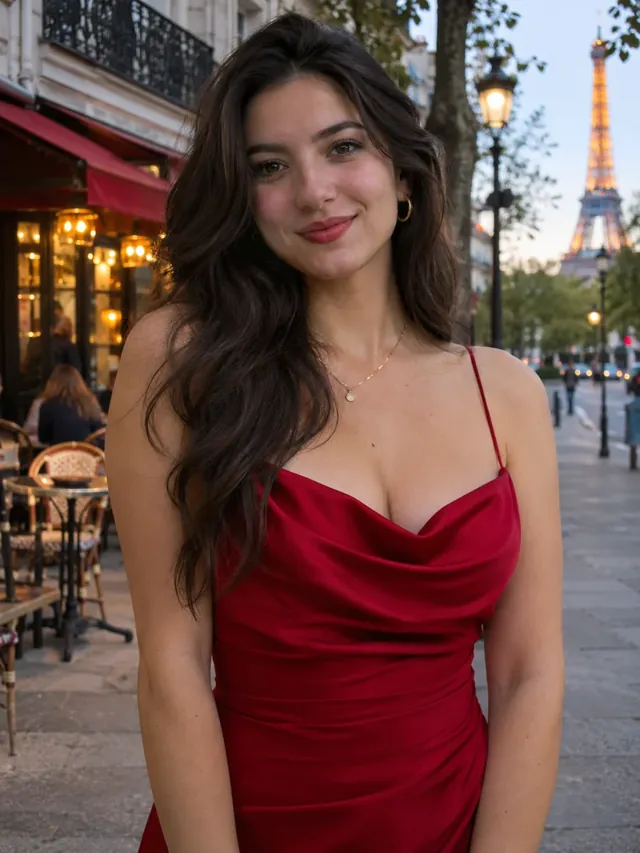
Use the uploaded photo of the woman as the only reference for her appearance. Preserve her face shape, eyes, nose, lips, age, hairstyle, and natural proportions. Change her outfit to a red evening gown. Place her on a Parisian street with cafés in the background. Soft evening light, waist-up portrait, realistic photography, 3:4 aspect ratio. 50mm lens, eye-level camera, shallow depth of field.
Independent exercise: two images from one concept
Create a portrait of a person in an autumn park using two approaches.
- Without a source photo: describe a fictional person, their clothing, pose, composition, and lighting.
- With your own photo: preserve the person's appearance while changing their clothing and background.
- Compare the two results. Check the composition, face, hands, lighting, and how closely each image follows the prompt.
- Correct one mistake you find and compare the new version with the previous one.
You have completed the exercise when you can explain which details the AI took from the source photo, which it generated independently, and which prompt change affected the final image.
How to create AI photos without writing prompts
If you want a specific result, you can use a ready-made Neuromia template. Each template provides a predefined editing workflow, so you do not have to write a description from scratch.
The following pages are available for different tasks:
- AI photoshoot: create a photoshoot using your own photo.
- Christmas photo: turn a photo into a festive holiday image.
- Birthday card from a photo: create a personalized birthday greeting from a photo.
- Photo restoration: restore an old or damaged photograph.
- Photo enhancement: improve the visual clarity of a photo.
- Professional resume photo: create a professional headshot.
- Anime from a photo: transform an uploaded photo into an anime style.
If you want to control the clothing, lighting, and composition yourself, choose a prompt from the catalog. If a predefined workflow matches your goal, open the corresponding template.
What to learn next
The next lesson in the course is “How to create an AI photoshoot with your own face”. You'll apply these techniques to a series of photos featuring the same person: choose suitable source images, preserve recognizable facial features, and create several consistent portraits with different looks.
If you need images for selling products, the lesson after the AI photoshoot covers creating product listing images for online marketplaces.
Frequently asked questions
How do I write an AI photo prompt using my own face?
Start with “Use the uploaded photo as the source image.” Then specify that the person's face, age, hairstyle, and natural proportions must be preserved. After that, describe the changes you want to make to the clothing, background, and lighting.
Do not describe a new appearance if you want the person to resemble the original photo. How accurately the face is preserved depends on the model and source image.
What prompts work best for editing an existing photo?
For photo editing, use prompts that explicitly refer to the uploaded image. Clearly separate the details you want to preserve from those you want to change.
For example: “Preserve the person's face and pose. Replace the background with an autumn park, add soft sunlight, and use a 3:4 aspect ratio.”
For photo restoration and enhancement, use separate instructions that do not require changing the person's appearance.
How do I generate a realistic photo of a woman with AI?
Specify the adult character's age, clothing, location, shot size, and lighting. Add “natural skin texture, realistic proportions, soft daylight.”
If you are using your own photo, ask the model to preserve the original appearance. For generation from scratch, describe the character's appearance in words.
How do I create a family or couple photo from two images?
Upload the source images if your selected mode supports multiple photos. Specify which person to take from each image, where to position them, and what background to use.
Include instructions to preserve each person's face and age. After generation, check whether both faces resemble the originals. Combining photos can sometimes change people's appearances.
Can I write prompts for ChatGPT and other AI models in languages other than English?
Yes. Many image generation models, including GPT Image 2.5 and Nano Banana 2.1, support prompts in multiple languages.
For complex scenes, clarifying your instructions is often more useful than automatically translating the entire prompt into English.
Why does AI change faces or refuse to edit photos?
A face may change if the prompt describes a new appearance, the source photo is not clear enough, or the model struggles with the requested transformation.
A model refusal or moderation rejection is a different problem. Read the error message and check the content of your prompt and source image. Clarifying an allowed request may help, but it does not guarantee successful generation.
How do I enhance an old photo using an AI prompt?
Ask the AI to remove scratches, stains, and noise, improve sharpness, and preserve the original faces.
For example: “Restore the uploaded old photograph. Remove damage to the photographic paper while preserving the original composition, ages, and facial features. Do not add any new people or objects.”
AI may invent details that cannot be recovered from the source image. Always compare the result with the original. You can also use the photo restoration template for this task.
If you need a passport photo or an image for another official document, do not use an AI-generated image in place of an authentic photograph. Official photo requirements vary by document and issuing authority.